
DOWNLOAD THE APP


Customer Services
Copyright © 2025 Desertcart Holdings Limited
DOWNLOAD THE APP


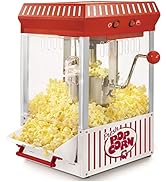
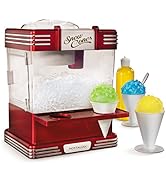
🍿 Popcorn nostalgia meets professional performance—make every movie night legendary!
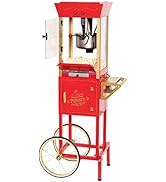
The Nostalgia Popcorn Maker Machine combines vintage movie theater charm with professional-grade features, including a 2.5 oz stainless steel kettle with built-in stirring, tempered safety glass, and a mobile cart design. It pops up to 10 cups per batch and supports all Nostalgia popcorn kits, making it the ultimate centerpiece for home theaters and snack lovers seeking authentic, fresh popcorn with a retro flair.


| ASIN | B00EFW7HPK |
| Best Sellers Rank | #144,821 in Kitchen & Dining ( See Top 100 in Kitchen & Dining ) #137 in Popcorn Poppers |
| Brand | Nostalgia |
| Capacity | 2.5 ounces |
| Color | Red & White Stripe |
| Customer Reviews | 4.2 4.2 out of 5 stars (2,660) |
| Date First Available | July 29, 2013 |
| Global Trade Identification Number | 00082677713162 |
| Included Components | Cart, Kettle, Popcorn Maker |
| Is Discontinued By Manufacturer | No |
| Is Electric | Yes |
| Item Weight | 16 pounds |
| Item model number | KPM200CART |
| Manufacturer | EMG East, Inc. (direct order) |
| Material | Alloy Steel |
| Product Dimensions | 16.5"L x 12"W x 45"H |
| Special Feature | Lighted Interior |
| UPC | 082677713162 |
G**N
Love it!
I've been wanting this machine since 2020, but didn't have enough space for it. Well, we bought a home and we turned our 2nd bedroom into a movie room! It's small, but we wanted a small unit since our space was small. It fit perfectly behind the door. It's plastic, but for what you pay It's good quality. Would recommend using the hand held screwdriver that it comes with vs electric bc the power drill can over tighten it and crack the plastic. So far, it works well and makes good popcorn! Love the smell of the popcorn when it's going. Feels like you're at the theaters. Only con is I wish there was a way to keep the popcorn warm when its sitting or tht it was hotter coming out the pot. Overall, would recommend.
B**N
Patience is required to get a great result
My wife bought this for me as an early Christmas present. We love how it looks in our kitchen and it does a good job of popping the corn. To clean out the kettle of anything stuck inside, my wife placed a bowl underneath, then tilted the popper and wiped out the inside with a slightly damp paper towel. This way there won’t be anything inside to burn when you preheat the popper for the next batch of popcorn. Putting it together is another story. I have never seen directions that are so poor or lacking in detail. I will offer a few of my suggestions. First remove the kettle from inside the main unit. Kettle is packed in Styrofoam. Only way to get the kettle out is to pull the kettle straight up and out of the Styrofoam. It is tight. You really have to pull. The Styrofoam can now be titled and taken out. Wipe out the inside of the main unit and the kettle itself. Assembly: Inside the box are 2 basic wrenches and 1 quality screwdriver for assembly. Be aware that the two washers, nuts and screws will be fastened together in the package for the handle. They are not separate pieces to find. You will have extra #4 screws. In Step 1 the bottom plate is solid and the flat side will face up. The top cover has two pieces. Once the top cover is screwed on the other piece snaps in place. During this step I tilted the Compartment G on its side to make it easier to find the holes in the cover plates. The screwdriver supplied will work but it's a tight fit and the screws are very small so it's easier to tilt it on its side to find the holes and put the screws in. Also realize that you have to apply pressure to put the screws in. Some screws will not work so I believe that is why you get extra. In Step 3 make sure the edges of the outside of the door are over compartment G before you fasten the door at the top and bottom with screws. In Step 4 make sure the bar is attached to the inside of the wheel. In Step 4 find the end of the support bar with the small hole and slide it over the push pin on the rod that is now attached to the wheel. In Step 9 it will take 2 people to slide the assembled storage compartment G over the 4 rods. Push it all the way down until the support bars touch the top cover plate. Place the main unit on top of the storage compartment and then flip the 2 spring loaded rods underneath the main unit and it will 'lock' into place. After you plug the electric cord to the kettle it is easier to place the kettle inside the unit by tilting it and placing the left side in its slot first. Attach the crank handle knowing that the handle is screwed in counterclockwise. There is a push button on the door to the main compartment. To keep the front fold out door closed you must push it in first and then close the main door. Finally you are ready to enjoy your popcorn.
W**6
Not as big as some units, but it gets the job done at this price. Minor tweaks make a big change.
I have used these style of popcorn machines for nearly 10 years at home. When I recently moved, I was unable to take the last machine (and stand) with me, so it was about time I could replace my last 16 ounce popper. I was a bit reluctant to try an 8 ounce popper this time, but shipping costs and the machine costs, as well as never trying to the Vevor brand made me want to give the lower cost model a try. I wouldnt give this model 5 stars, but it is actually pretty good for the money. Pros: Low costs, decently packed (made it 8k miles of shipping without even a scratch), easy to assemble (though the manual could be improved on the actual popper, it has more instructions on the cart that wasnt on my model than the popper itself), pops pretty quickly, relatively easy to clean (they are all kind of the same), good amount of popcorn per batch. Cons: Smallish interior cabinet, hard to reach around the kettle without getting burned, initially if you dont adjust the kettle lid - it jams quite frequently, warmer could be more broad in coverage than the back left area, not a 12/16 ounce. Cleaning: For all those reviewers that say the unit is hard to clean, you might not be aware how to clean a popcorn machine of this style. All you need to do to clean the unit is just add about a quarter cup of water to the kettle and turn the warmer on. NO CHEMICALS AT ALL! Do not add anything to the water, no need for special "kettle cleaners" etc. Just some plain water in the kettle and let it heat up and create a lot of steam. This will make it very easy to wipe down the inside of the glass and surfaces with just steam and some paper towels, careful not to touch the kettle. When you get through the first amount of water, add a second bit of water to the kettle and possible a couple more paper towels into the kettle and this time turn on the stirrer for a bit. Keep an eye on the unit as you dont want to go too long with this part or run dry of water. You will notice the steam and paper towels make very quick work of left over burnt residue and black marks. After two passes you should be all clear. For the initial bit, before I steam at all, sometimes I run a small shop vac I have DEDICATED to the popcorn machine to get all the salt and loose kernels lying around to give it a nice clean and then steam. Generally I only do this about once every 3 months or so. Or as you see fit. Popcorn to use: For me, I prefer the premeasured popcorn you can find here on Amazon. Usually in packs of 24 or more. This already has the best amount of salt/butter flavoring/kernels for the machine. 8 ounce packs work perfect. Of course, you can use 4 or 6 ounce as well, it just wont have as much popcorn after completion. Many don't know, but the secret to true movie style theater popcorn is the kernels (have to be the best golden mushroom style), coconut oil (usually butter flavored), and Fold Medal Flavacol (butter flavored fine grain salt). These three ingredients, not burning it, and removing moisture during and after the pop are the key to the best popcorn you have ever tasted consistently. Tweaks I made for better results: I found that out of the box, the unit gets jammed up on my 8 ounce packs from too much popcorn being spun around by the stirrer before it gets a chance to get pushed out. The popcorn can jam up against the middle bar area between the kettle lid parts that get pushed upwards during popping. What worked for me is loosening the wing nuts holding the lid on the popper about 1/4 to half backed off the bolt. This allows the lid and center section to have some give when the stirrer moves the popcorn around and prevents (for the most part) binding on the shaft turning the stirrer. Before I made this tweak, it jammed every time and I had to manually stop the machine stirrer and force the stirring rod out and dump the popcorn out with lots of unpopped kernels. Thankfully I found a way around that. Also, the under tray popcorn warmer is not touching the bottom of the tray. I believe this is as intending, but it means that the heat transfer from the warmer is weak. I would not make the tweak I made here, if you intend to leave the warmer on for long periods (days), as I havent tested what happens then, but for short periods of time (hours) it works better to get the heat into the tray metal and transfer to the popcorn kernels sitting in the bottom of the chassis. Your results may vary. Love this machine, and I will eventually upgrade again to a 16 ounce unit, but for now, this will hold me over with great tasting popcorn like the theaters.
K**N
Great little machine
If you were expecting to become a popcorn street vendor and wheel this cart through the streets of LA, you will be disappointed at its sturdiness. If you were expecting to get a family sized machine for $120 that sits in a corner and is turned on for movie nights, all will be well! The size is great - small enough to hide away in a corner, closet or walk in pantry when not being used. Works great and it was very easy to clean after use. We used the 2.5 ounce All in One bags and there was very little wasted kernels and enough popcorn to satisfy three kids. I really think a lot of the negative reviews for this machine are from people misusing it. Follow the instructions and take your time putting it together. Let the kettle heat up the oil for 4-5 minutes before putting in the kernels. Don’t overfill it with kernels. Clean it within an hour of use. Treat it gently. You’ll be fine.
M**Y
Popcorn machine
This popcorn machine is the perfect size for when my grandkids visit. Easy to use and easy to clean.
P**A
Me encanto y es tal cual se muestra aunque a decir verdad creo que lo esperaba mas grande peeero se ve muy buena y cumple con su funcionalidad, todo muy bien. Llego dentro del tiempo que se dijo. Ahora si a comer!
C**N
Fácil de usar y la preparación es muy rapida
T**S
looks cool makes good popcorn with no hassle kind of forces me to eat popcorn without salt and butter which is healthier what more could you ask for in a popcorn maker instructions written in tiny print with tiny illustrations - not so good for an old boy like me lots of tiny screws involved in putting it together but patience paid off I would definitely recommend this popcorn maker.
C**N
Fait du Très bon popcorn les enfants adorent.
E**N
We love it
Trustpilot
1 month ago
1 month ago