We remain fully operational. Our teams are working around the clock to ensure your deliveries continue safely.

DOWNLOAD THE APP


Customer Services
Copyright © 2025 Desertcart Holdings Limited
DOWNLOAD THE APP


💡 Bring your headlights back to life — see and be seen in style!
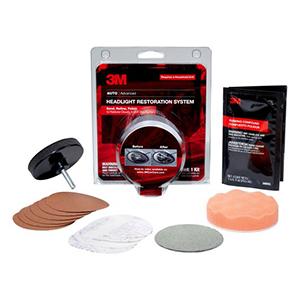
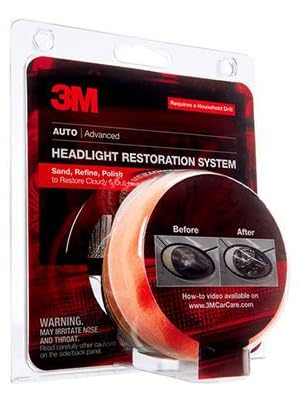
The 3M Headlight Lens Restoration System (Kit 39008) is a comprehensive, drill-powered sanding kit designed to eliminate yellowing and cloudiness from automotive headlights. Featuring multiple grit sanding discs and a rubbing compound, it restores clarity and brightness, enhancing both vehicle appearance and nighttime driving safety. Trusted by thousands, this easy-to-use kit delivers professional results without the cost of replacement.

| ASIN | B001AIZ5HY |
| Best Sellers Rank | #2,569 in Automotive ( See Top 100 in Automotive ) #10 in Automotive Headlight Restoration Kits |
| Brand | 3M |
| Customer Reviews | 4.4 4.4 out of 5 stars (33,686) |
| Date First Available | May 30, 2008 |
| Exterior | Machined |
| Global Trade Identification Number | 00051131390089 |
| Grit Material | Aluminum Oxide |
| Grit Number | 500 |
| Grit Type | Medium |
| Is Discontinued By Manufacturer | No |
| Item Weight | 4.6 ounces |
| Item dimensions L x W x H | 6.14 x 4.51 x 0.84 inches |
| Item model number | 39008 |
| Manufacturer | 3M |
| Manufacturer Part Number | 39008 |
| Material | Plastic |
| Mirror Lighting Type | automotive-exterior-headlight-bulbs |
| Model | 3M |
| Number of Items | 1 |
| Product Dimensions | 6.14 x 4.51 x 0.84 inches |
| Set Name | 3M Headlight Lens Restoration Kit |
| Special Features | Not_Performance_Used |
| UPC | 051131390089 |
N**Y
Make Your Headlights Shine Like New Again! 🚗💡
Are you tired of driving with dull, cloudy headlights? Look no further, because the 3M Headlight Lens Restoration System, kit number 39008, is an absolute game-changer! Let me tell you, I recently tried this kit on my car, and the results were mind-blowing. It's like my headlights went back in time to when my car was brand new 🌟✨.This kit is super easy to use, even for someone like me who's not that great with DIY stuff. The instructions are clear and simple to follow. Plus, all the materials you need are included in the kit, so no need to run to the store for extra stuff. The best part? The difference it makes on the headlights is incredible! They look crystal clear and shiny, just like they did when I drove my car out of the dealership for the first time.I can't recommend this 3M kit enough. Trust me, your car will thank you, and you'll love driving around with headlights that look brand spankin' new! 🌟👌
B**.
Exceeded expectations - great product
It took me awhile to get around to using this, but I finally got it done last weekend. This exceeded my expectations. Took me about 40 minutes to do both headlights on my SUV. Final results are excellent. They look brand new, bright and crystal clear. I had my doubts as I was doing it, but sure enough in the final step they buffed out clear. It has been a week since I completed it, so I can't comment on how they hold up over time, but I can't see why they wouldn't. The lenses on my SUV were half fogged up, mainly the upper half that gets exposed to the sun, so they weren't horrible from the start. But the headlight lenses are over 13 years old. The SUV has 220,000 miles on it, so I didn't feel like buying a whole new headlight housing. The housings are actually pretty cheap ($40 each if I recall), but sometimes the installation of the housing is a pain in the butt if you can't easily access every bolt. Thus, I wanted to give this a try. In this kit they give you multiple disks of the 500 and 800 grit. Then one of 3000 and one buffer pad. I only used one of the 500 and 800, which did both headlights. I wiped off the lens and pad every couple minutes to avoid build-up. I also didn't go full speed with the drill to avoid having the plastic head up (maybe half speed). I bet there's enough disks left over to do another 5 sets of headlights. So I wouldn't worry about running out. I used my electric drill at home, which didn't even use up a full charge on the battery. I took my time, mostly to be careful. The instructions say to go over the lens 6-8 times with each grit paper, but I bet I only did 4. Seemed like plenty. Also, it recommends to put masking tape around the molding surrounding the light to protect it. I put two layers and due to being sloppy I went off the lens and hit the tape. It sanded right through it and put a small scratch in the molding. After that I put a layer of duck tape on top of the masking tape. It was much more durable and didn't lead to any more scratches. It was so easy and the results so go, I'll probably go do my mother's car for her. Her car is newer than mine, yet for some reason more fogged up than my own.
P**G
Good Product That Works
Product works great, requires patients and some skill/common sense. Follow the instructions to the letter and read some 4 star reviews on how to get good results. Expect to spend 1 hour per light. Alternative is buy new aftermarket lights total $100 for my 2005 Honda Pilot. I used a 3M restore kit March 2019. Came out great but was manually sanding for an hour per light. My drill at 0-1500 RPM worked fine and was much easier than hand sanding. My takeaway: 1. My drill with variable speed 0-1500 RPM helps keep pad more manageable 2. Follow the instructions to the letter, 2 layers of tape to protect car, more sanding per step is recommended/needed 3. Whip off light and sanding pad/disk often 4. Most important, steps 10-13 on instructions - Spray water on lens and gray pad often to keep it wet, wipe and spray water again, helps remove film and small scratches from white sand paper, spray again to see what you missed 5. Buff using orange pad to get clean/clear lens The reason for 4 stars is that the 3M kit in 2019 came with a clear lacquer that may extend the light from yellowing but was not easy to apply with an applicator (not a spray). So I applied Canuba wax to protect it for 6 months. I expect another 5 years till yellowing. Time will tell.
R**S
Muito bom e chegou rápido. Recomendo.
S**E
The instructions are very clear and the product works very well. There is a learning curve and it will only be as good as the effort you are willing to put in. It is a little time consuming but it makes a huge difference. This is the first time in 7 years that I have restored the headlights and it made a big difference in clarity. The picture has the left headlight not done and the right one finished and you can tell the difference easily. I just kept my drill on speed 1 and controlling the sanding was really easy. When using the 3000grit pad use a lot of water and it does a great job making it almost clear, then the compound finished it up to almost like new. I am very pleased with this kit. I do wish it came with a sealing wax for when you finish but that’s not a big deal.
A**J
J’ai acheté le kit 3M 39008 de restoration d’optiques de phares et Le résultat est excellent. Les optiques de phares de ma voiture avaient mal vieillis, et après recherche, le kit 3M est apparu comme le meilleur produit. La seule différence est que j’ai commencé à poncer manuellement les optiques avec du papier de verre « carrossier » de grain 400 et à l’eau avant la procédure préconisée par 3M dans son tuto sur YouTube, astuce trouvée sur un forum. Le résultat est bluffant, les optiques paraissent neuves, ça rajeunit la voiture, j’y gagne en sécurité et je suis serein pour le contrôle technique. Le seule défaut que je note est l’absence du ruban adhésif de protection, qui doit être acheté à part.
A**C
I used this product and some other off the shelf liquid compounds and got a great result. This is necessary because of the sanding steps.
D**.
Premetto che non avevo mai usato prodotti simili, non è stato difficile capire il sistema per riportare i fari dell'auto in condizioni quasi nuovi, a patto che essi non siano rovinati dall'interno. Anche perché le istruzioni in italiano non ci sono, ma nessun problema, all'interno c'è l'indirizzo per un video che vi spiega come fare bene i passaggi. Comprato per sistemare la mia auto, a fine lavorazione, c'ho fatto anche i fari di un'altra auto e la mascherina di un altro automezzo, essendo anch'essa dello stesso materiale dei fari. Nella lavorazione sono stato molto cauto e, se come me non siete del mestiere, conviene prendervi tutto il tempo necessario per capire il procedimento. Siccome la mia auto ha delle cornici cromate intorno ai fari, ho dovuto smontare gli stessi per rimuoverle, ma se la vostra auto non ha le cornici cromate, vi consiglio di non smontarli dall'auto, in quanto la lavorazione è più facile. Dopo aver finito la mia auto, che sono tornati come nuovi, mi erano avanzati altri dischetti, c'ho fatto anche i fari dell'auto di mia zia, con sorprendente risultato anche su questi, che erano nella stessa condizione dei miei. Consiglio per la lavorazione di usare un trapano a corrente di bassa potenza in quanto è leggero e molto manovrabile. Tanto non bisogna fare troppa forza sennò si rischia di rovinare il faro. Uno spruzzino con acqua, per la terza parte della lavorazione e dei panni dismessi da usare come stracci per pulire durante le varie fasi. I miei fari non erano in condizioni pessime, ma iniziavano ad avere le fastidiose macchie opacizzanti, così come l'altra auto. Prodotto buono e a basso costo, con risultati eccezionali!
Trustpilot
2 days ago
2 months ago