Buy anything from 5,000+ international stores. One checkout price. No surprise fees. Join 2M+ shoppers on Desertcart.
Desertcart purchases this item on your behalf and handles shipping, customs, and support to Colombia.
🚀 Double Your SSD Power, Keep It Cool, and Upgrade Like a Pro!
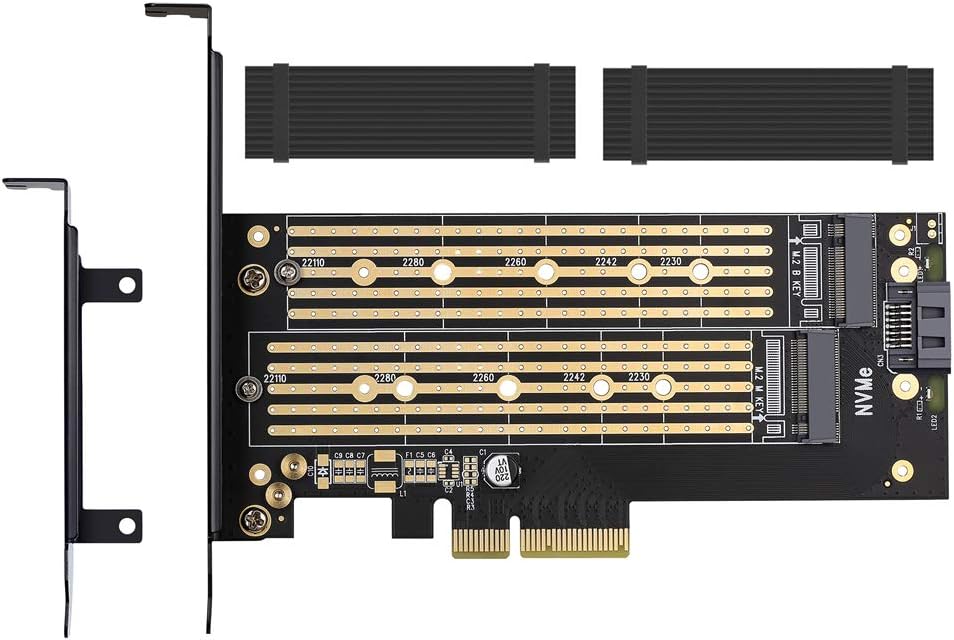
The YATENG Dual M.2 PCIe Adapter lets professionals and tech-savvy millennials effortlessly expand their storage by supporting one NVMe (M Key) and one SATA (B Key) SSD simultaneously. Engineered with advanced heat dissipation featuring dual heat sinks and copper ventilation, it ensures sustained high performance. Compatible with all standard M.2 sizes (2230 to 22110) and designed for easy installation with flexible bracket options, this adapter delivers plug-and-play convenience and PCIe 3.0 x4 speeds, making it the perfect upgrade for high-performance desktops and workstations.


| ASIN | B07JKH5VTL |
| Best Sellers Rank | #29 in Serial Adapters |
| Brand | MHQJRH |
| Compatible Devices | Personal Computer |
| Customer Reviews | 4.2 out of 5 stars 1,741 Reviews |
| Hardware Interface | PCI |
| Item Dimensions L x W x H | 7.3"L x 4.2"W x 1"H |
| Manufacturer | YATENG |
| Mfr Part Number | M.2 Adapter |
| Operating System | Linux, Mac OS, Windows |
| Product Dimensions | 7.3"L x 4.2"W x 1"H |
| Style | Classic |
| Style Name | Classic |
| UPC | 192242109143 |
| Unit Count | 1.0 Count |
J**S
Works Great! - But Needs More Explicit Instructions - Read Mine
I used the Yateng board to install a Samsung 970 EVO PLUS 1 Tb M.2 vNand SSD in a Gen 3 x4 PCIE slot. The result is that even though the Yateng board is sharing the PCIE bus with an nVidia GTX 1070 Super x16 graphics board, the Samsung 970 EVO PLUS performs close to its maximum specs and is faster than my 512 Gb KIOXIA (Toshiba spinoff) System drive on a Windows 10 Pro vers. 2004 computer. The instructions as far as mounting the heat radiator on the NVME drive board are clear enough BUT at least as first installed, the silica gel does not make contact between the back of the radiator board and the front surface of the Samsung SSD board-because the Samsung board is NOT flat! One can see air gaps between the radiator, the gel pad, and the Samsung board - so much for heat radiation - however when all was assembled and put into the computer, the Samsung Magician software says the board is operating at a normal temperature, 102 to 109 deg F in a house that's 82 to 86 deg F itself. Perhaps with time the gel pad supposed to absorb water from the air and swell to make contact???? The next challenge was how to screw the left end of the Samsung SSD board to the Yateng PCIE board (see 1st attached photo). There's a packet of 4 screws in the Yateng box but no instructions. The bracket in the Yateng on the right to plug in the SSD NVME connectors elevates the SSD drive off the Yateng PCIE board. So you don't want to screw the SSD board flat down on the left or you might strain or break the NVME receptacle on the right or stress out the SSD drive itself. Looking around the Yateng board, there are TWO knurled knobs screwed onto the board with screws that come through the other side of the board (lower left of photo). It turns out that if you unscrew a knob, use its indented edge to prop up the left end of the SSD board, then insert and tighten the screw from the other side of the board, the SSD board is very nicely mounted and supported over the Yateng board, same height on both ends, parallel to Yateng board. The 2nd screw/knob combination in the lower left of the Yateng board I left in place. That's presumably for anyone who wants to mount a 2nd NVME SSD board in the upper slot and use it as a (much slower) SATA SSD drive with the supplied SATA cable, etc. Last problem with no instructions supplied was how to attach the mounting bracket to the Yateng board (if you open your computer and look at the space the board is going to go into, you'll know from the size of the filler bracket already there whether you need to use the large or small mounting bracket supplied with the Yateng board). I need to use the larger mounting bracket as I have a big computer case. If you look carefully at the 2nd photo I've attached, you can see that the mounting bracket attachment points GO BEHIND THE YATENG BOARD, not on the same side that the SSD is mounted. So if you put the mounting bracket behind the board, the two smaller screws supplied in a bag work nicely to clamp the Yateng board between the screw heads and the mounting bracket attachment points. Once I had inserted the board, closed the case, reattached all the wires, powered my computer up, I went to the Windows 10 disk management utility and allocated the drive as a GPT partition table and formatted the drive with NTFS as a simple volume. I then downloaded Samsung Magician and ran some performance tests. Ideally, the Samsung drive should be able to do 3,500/3,300 MB/s read/write performance. The performance I got in the PCIE slot was not quite there (see 3rd attached photo) but close enough for me (I was actually moving the mouse from time to prevent the screen from timing out and I did not shut down any normally running system processes, either and also as I mentioned, I have a HUGE graphics card using the PCIE bus, too). The performance is better the 512 Gb KIOXA system drive inserted directly into an NVME slot on the motherboard, especially 3x better for random reads and writes (see 4th photo). For anyone using Windows who wants to know why to make a choice for GPT partitioning vs. the more classic MBR, I found a nice article entitled "MBR vs. GPT: Which Should You Use for Your SSD?" on the makeuseof . com website. You can probably easily find it by a Search. There are some reasons for choosing MBR but GPT is usually the better choice.
A**8
Awesome, no issues, working great in the lower X16 slot of my Dell Aurora R7!
Installed the dual adapter for SATA or PCIE NVMe and it works great with my Dell Aurora R7. It works plugged into either an x4, x8, or x16 slot. I put this in my lower x16 mechanical (x8 electrical) slot under my GPU. I’m getting 3500 read and 1850 write with an OEM Samsung 860 Evo Pro M2 NVME PCIE 2280 drive (see photos). This product does not include any instructions whatsoever. But installation is straightforward. This is all you need to know: The faster NVME SSD goes into the slot marked “M Key.” M means there’s only one notch on the right side of the drive where you plug it in, if you’re looking at it from the side the manufacturer’s label is printed on. No SATA cable is required or useful for this setup. The adapter is set by default to fit a 2280 length (80 mm) drive and the bolt for this connection is not removable. If you have a longer or shorter M2 drive, it includes 2x screws and 2x bolts for you to install and attach the drive. I attached a photo of this product with an M Key drive. A second drive, or a slower drive with two notches, or one notch on the left-hand side, gets plugged into the “B Key” slot. B referring to there being one notch on the left-hand side of the drive where you plug it in (the specs say it will also accept an M+B key drive with 2 notices). If you use a second drive, you will need to use the supplied SATA cable – i.e., plus side no x4 bifurcation needed in bios, downside, a PCIE drive gets downclocked to SATA speeds of 600. The temps on my drive aren't going above 35 C (I'm using this drive for weekly image backups) so I didn't bother attaching the supplied heatsink to the drive. Otherwise I'd question how durable the rubber band would be long-term considering the intended use of holding down a heatsink...
K**E
Works great- review slot configuration fully
Fits perfectly. The only reason for 4 stars is that the second slot will not accept the SSD. As they only fit one way you need to make sure you have the proper SSD that can be installed in second slot. Works great speeds are fine and installation was simple. Not sure what type of SSD card is needed to fit in second slot? I have many of them and I cannot get any to work in that slot.
J**F
Wow!
Had a little trouble setting it up but worked perfectly and fixed my issue with sata m.2.
N**N
Quick boost to an aging system
System: HP Elite 800 G1 SSF (yes, very old) Combo with: Kingston A400 240G Internal SSD M.2 2280 SA400M8/240G (used as boot and basic apps) Silicon Power 512GB NVMe M.2 PCIe Gen3x4 2280 (used as secondary disk for intense-hogging apps and caching) Warnings: * Will NOT work on older BIOS that don't support PCIe boot. Not even with the SATA NVMe connection. Just not going work. I'm lucky enough to discover that the latest 2.78 BIOS update actually allows PCIe to be detected and usable. * Will NOT work if you're depending on the PCIe NVME M.2 as the primary boot up because it's faster. Not going to happen. You MUST have the M or M+B Key SATA as the primary boot at max of 500MB/s read-write rate. With those warnings in mind, overall, the addon is quite awesome. Going from the SATA III with read-write at 120MB/s max, loading up at 500MB/s beats the old SATA III HHDs hands down. Paired up with M.2 500GB or 1TB, the system renewed with a new life to do light photoshopping/video editing for beginners. My old HDDs would have disk throttled at 90% to 100% constantly. With these additions, the HDD remains constant at 0% or max at 10%. Kids play games, and no hangup or bottlenecking. Compared to SSD and the old HDD temperature, SSD peaking out at 44C while the HDD roasts at 58C after 60 minutes. The provided silicone strips and radiating fins help with the temperature dissipation and maintained at 36C after 60 minutes. Not a bad deal.
S**K
second slot could cause you troubles.
P o S Pay attention that the pin for the top slop is on another side - meaning you need to insert you m2 with memory cips down - so you'll have to stick the radiator on the back of the plate. Also for me even that way i was not able to insert the second m2. Returned.
R**L
Reasonably easy to install once you figure out how. Could have used better intructions.
Had to look up how to install this as the instructions weren't clear on the most important points, especially with respect to the support studs. For certain M.2 NVMe and SATA drive lengths I discovered that you had to remove the installed support stud from the card and remove the replacement stud from the card (as they too are installed on the card) as well. Also, the drive doesn't sit on top of the support stud as most do, they fit in a slot on the stud and so you have to slide the card into the stud slot, then attach the stud to the board from underneath; very unhandy. I like the way the card fits snugly into the PCIe slot. Another thing that I don't care for is that the heat sinks' adhesive is poor as they fell off the drives after about a month. I do like the fast data rate speed for both writing to and reading from the drives. The card didn't require the addition of new drivers either; it was truly plug and play. UPDATE I have used this card with an NVMe M.2 and a SATA M.2 installed on it and it makes backing up my data very easy; I no longer need to unplug any cables and, therefore, don't need to remove the case cover. I just take the primary drives that I use that are installed onto/connected to the mobo offline after backing up to the drives installed on the card and modify the UEFI to boot from the boot backup drive to verify that the backups were successful. Then I put the primary drives back online and take the backup drives(drives installed on the card) offline and reconfigure the UEFI to boot from the primary boot drive and I'm ready to go again.
L**D
Great. Why would I use it though?
1. No m.2 slot on your motherboard 2. Want to keep your all SATA ports intact 3. Aesthetics This thing is great for what it does. I have m.2 slots on my z390 MSI Gaming Edge AC motherboard, but I did not want to plug m.2 nvme to the port near i9 9900k, and next to GPU. If I was to use the m.2 slot below my gpu I would lose 2 SATA ports. So this is where this thing comes in clean. You can plug the pcie card into a bottom slot or slot below your graphics card. Just make sure you are not using parallel GPU ports or your graphics card will drop down to 8x, instead of it's max 16x value, this will make you lose FPS in games by about 5% to 10%. Also do not plug this card into pcie slot above your graphics card, or you will once again reduce your GPU power to x8. In my set up I have GPU in PCIE 3.0 x16 slot, firewire card for my sound interface in PCIE 3.0 x1 slot, and m.2 adapter card (this) in PCIE 3.0 x4 slot. This will still allow my NVME to fully work at 100% capacity, and I am not losing x16 functionality of my GPU. PCIE 3.0 x4 will still allow up to 3.9 GB per second transfer. PCIE 2.0 x4 will still allow up to 1.6 GB per second transfer PCIE 2.0 x2 will still allow up to 800 MB per second transfer and regular Sata III up to 600 MB/s So if you are reviving your old PC with this simple adapter it's well worth it. I have a relatively inexpensive M.2 NVME that can do 740 MB/s, and it's more than enough for me. Samsung Evo 860 Sata III is about 550 MB/s, and I have 3. If you are going for fastest m.2s, then go for Samsung Evo 870/860/850. Just keep in mind what PCIE lane you are using, and what gen it is (3.0 or 2.0) Plugging sata m.2s into nvme slot will result in no detection of you m.2. It will go in top slot and needs sata connection into open sata port. But you are limited to 600 mb/s max speed. M.2 sata is b-key, nvme goes in bottom slot of the adapter. No speed is reduced in comparison of real nvme slot on your motherboard. I ran Crystal Mark to confirm Leds are very bright, so I took a screwdriver and popped them out. They are about 10% length of a match, and about half as thick. Solution for those that don't like the red light blinking. Also adatpter comes with nice heatsinks. I am satisfied with this adapter for what it is. If you need B-Key/M-key adapter with no wire required, look on ebay for it. I found one for about $30. It has a converter that this card does not have, hence the sata cable. Like I said, nvme does not require one though.
D**N
Boost Your Storage Performance with the Versatile Dual M.2 PCIe Adapter!
I recently had the pleasure of upgrading my storage setup with the Dual M.2 PCIe Adapter for SATA and PCIe NVMe SSDs, and I must say, it has exceeded all my expectations. This little powerhouse has transformed my computer's storage capabilities and has added a whole new level of convenience to my computing experience. Installation was a breeze. The adapter comes with clear and concise instructions, making it a straightforward process even for those who are not tech-savvy. Within minutes, I had it up and running, ready to take advantage of the lightning-fast speeds offered by PCIe NVMe SSDs or the reliability of SATA-based SSDs. One of the standout features of this adapter is its dual M.2 slots, allowing me to use two SSDs simultaneously. This has given me the flexibility to create a RAID array for increased performance and redundancy, or simply use the two SSDs independently for separate storage needs. The possibilities are endless! The performance boost is truly remarkable. With a PCIe NVMe SSD installed, I noticed a significant reduction in boot times and application loading speeds. Large file transfers that used to take ages now complete in a matter of seconds. It's a night-and-day difference compared to my old setup. Another advantage of this adapter is its sturdy construction. The PCB is of high quality, and the M.2 slots firmly hold the SSDs in place, ensuring there are no connection issues. It's evident that this adapter was built to last, and I can trust it to perform reliably for a long time. Moreover, the adapter's compact design means it doesn't take up much space inside my case, leaving room for other components and better airflow. The low-profile bracket also makes it suitable for small form factor builds, further enhancing its versatility. I appreciate the thoughtfulness put into the thermal design as well. The adapter comes with efficient heatsinks that help dissipate heat during heavy usage, ensuring the SSDs maintain optimal performance even under sustained loads. In terms of compatibility, this adapter is truly versatile. It worked flawlessly with my desktop motherboard, and I've also used it on my laptop with an external PCIe enclosure. It's rare to find such a universally compatible storage solution. In conclusion, the Dual M.2 PCIe Adapter for SATA and PCIe NVMe SSDs has been a game-changer for my computing setup. Its ease of installation, exceptional performance, robust build, and adaptability have impressed me beyond measure. If you're looking to elevate your storage performance and flexibility, this adapter is an absolute must-have. Highly recommended!
A**N
High quality and well performing
A well put together and perfectly functioning PCIE adapter that comes with some nice bells and whistles. Having the screws/stand-offs attached to the card is a nice touch.
A**S
Sirve perfectamente para lo que fue concebido
Lo instalé en la ranura libre que tenía todavía en mi PC y ahora tengo dos discos SSD uno NVME y otro SATA que incrementan la capacidad de almacenamiento de mi PC. Es fácil de instalar, solo que no hace mención que los tornillos para fijar los discos están en la placa y yo pasé un rato buscandolos en la caja (pero solo hay que tener un poco más de atención)
S**.
Instalación sencilla
Se instala el disco y los drivers son automáticos lo reconoció perfecto
R**D
Good Quality, all parts to use included and worked well
I was pretty impressed with the quality of this item and all the little parts that were included (two heat sinks, two self adhesive thermal pads, short and tall bracket, lots of little screws etc.). The only think lacking were good instructions on how to put it all together. I found that reading another review here but if you are somewhat handy and and take your time it can all be figured out. As others have posted this kit supports one M2 drive with an NVME interface and on M2 drive with a Sata interface. It looks like it has mounting holes to support any standard length of M2 drives. I used it to install one NVME drive. I put it in my system (Windows 10 Asus ROG Here VI mb) booted up and it was recognized immediately without requiring drivers etc.
Trustpilot
1 month ago
2 weeks ago