


Buy anything from 5,000+ international stores. One checkout price. No surprise fees. Join 2M+ shoppers on Desertcart.
Desertcart purchases this item on your behalf and handles shipping, customs, and support to Colombia.
โจ Upgrade your counters, upgrade your space โ DIY luxe made easy! ๐ก
Rust-Oleum Countertop Transformations Kit is a comprehensive DIY coating system designed to revitalize worn laminate countertops with a durable, natural stone finish. Covering up to 50 square feet, it includes all necessary materials and step-by-step instructions, enabling a professional-quality upgrade in a weekend without costly replacement. The finish is stain-resistant, water-resistant, and reinforced with antimicrobial protection, ensuring long-lasting beauty and performance.


| ASIN | B004LB5EVY |
| Additional Features | special_feature |
| Base Material | solvent-based |
| Best Sellers Rank | #846,786 in Tools & Home Improvement ( See Top 100 in Tools & Home Improvement ) #8,653 in Wallpaper |
| Brand | Rust-Oleum |
| Brand Name | Rust-Oleum |
| Coating Description | Urethane |
| Color | Onyx |
| Compatible Material | Stone |
| Container Type | Can |
| Coverage | Full |
| Customer Reviews | 4.4 out of 5 stars 756 Reviews |
| Finish Types | Satin |
| Global Trade Identification Number | 00020066204525 |
| Included Components | PAINT CNTRTOP RFNSH KIT ONYX |
| Item Dimensions | 15.5 x 11.5 x 15.25 inches |
| Item Weight | 11 Kilograms |
| Manufacturer | Rust-Oleum |
| Manufacturer Part Number | 258284 |
| Material | solid |
| Material Type | solid |
| Model Name | 258284 |
| Model Number | 258284 |
| Number of Items | 1 |
| Paint Type | Enamel |
| Size | Large Kit |
| Style Name | Industrial |
| Surface Recommendation | Stone |
| UPC | 020066204525 |
| Unit Count | 70.0 Fluid Ounces |
| Warranty Type | Limited |
L**N
Rustoleum Countertop Transformations
We decided to overhaul our kitchen ourselves, because we were on a tight budget. We had existing cabinets and counters that were worn and dated, and we installed new unfinished cabinets and a countertop on the opposite wall. We needed to refinish everything so it matched, and we decided to use Rustoleum's Countertop and Cabinet Transformation products to make that happen. We started with the countertops... The kit comes with a DVD as well as an instruction booklet. DEFINITELY watch the DVD for technique and visual demonstrations. The instruction book is rather small with very fine print. I took the time to write out the steps / instructions and taped them up in the kitchen for quick easy reference. It made things easier to remember what comes next and to ensure we were using the correct tools / materials for each step. I highly recommend doing this because there are so many little things to remember! Also make sure you read the outside of the Countertop Transformation box. There are materials you need that will have to be purchased separately. My husband took Friday and Monday off from work, so we could take our time and make sure we gave each step ample time to be completed. We figured it would take us at least three days to get through everything and allow for drying time. Day One: Thursday I cleaned and prepped the kitchen. I took everything off of counters, cleaned them with disinfectant, moved the table and chairs into the living room, swept and washed the floor, and put away any miscellaneous items that might be in the way. I set up a work table with all the tools and materials we would need. I taped off the edges of the counter and put up protective plastic sheeting on the walls, floors, appliances, and base cabinets. Be generous with plastic and tape. You are going to generate a LOT of dust and the paint chips are going to fly everywhere. Cover EVERYTHING. I think it took me about three hours to get this all done, and this is time the DVD does not factor in to the project completion time. Day Two: Friday Friday morning we finished taping off the doorway to keep the pets out of the kitchen and to keep the dust / paint chips from spreading throughout the house. We put up the baby gate we use to keep Koa out of rooms, and we taped plastic up and secured it under the gate so the cats couldn't get through or over the gate. We had to repair the end cap of our old countertop and we had to attach the end cap of our new cabinet. We are also replacing the kitchen sink and faucets, so we removed those as well and taped plastic around the hole. We then started prepping the counters. We washed everything with soap and water and allowed them to dry completely. Each section of counter, including the backsplash and the front edge needs to be sanded. The kit comes with a "diamond embedded sanding tool" but it only comes with ONE. I purchased a coarse sanding block from Lowe's but it didn't even come close to matching the effect of the kit's tool. As such, Gabe ended up having to do all the sanding in this step. Once all the sanding is done, or if you're working as a team, once one section is done, you need to clear all the sanding dust from the counter. The instructions say to use a shop vac with a brush attachment, but we didn't have one. We simply used a small whisk broom and a dustpan. It works pretty well; you just have to make several passes over the surface and clean the brush / empty the dustpan frequently. You then will take a damp lint-free cloth and wipe off the counter until there is no residue left at all. I made three passes over each section, rinsing the cloth out between each pass. Once they were thoroughly dry, we ran our hands over the surface to make sure there was no dust left. We took a new dry cloth and ran that over each section as well. It took us about two hours to do all of this. Here is where timing comes in to play. You have to apply the base coat, and you then have a 20 minute window in which to apply the paint chips. It's important to work in a team to get everything applied within that window and to work in sections so that no one section dries before you're able to complete it. Because of our schedule for Saturday and the timing involved in the drying, we waited until about 8pm to start the base coat. We started on the new counter, which was a white-ish marbled color. I used the paint brush to do the backsplash, front edge, and ends. Gabe followed with the paint roller and filled in the middle. The instructions tell you to lay it on thickly, like you're frosting a cake. Take this literally and apply a liberal coating. You shouldn't be able to see ANY countertop through the base coat. Work on smallish sections at a time so you can get the paint chips down before the base coat dries. Once you've coated your area, spray the wetting agent on the surface. Spray liberally but not so much that it leaves puddles or drops on the counter. Follow this immediately with the paint chips. Start spraying the backsplash first, and move back to front from there. You will literally have to throw paint chips at the front edge of the counter to get coverage. It's pretty funny; don't worry about being neat because making a mess is unavoidable. Once you've finished one section, move on to the next, following the same steps. Have a flashlight on hand. Shine it all over and around the counter. If you see ANY shiny surfaces, this is base coat showing through. Throw more paint chips on those areas until you can't see any shine at all. They give you WAY too many chips so you can be as liberal with them as you want. (We still have 2 ยฝ bags of chips left!) This stage took us about 90 minutes from start to clean up. Day Three: Saturday Once the base coat has dried, it's time to clean off the excess paint chips and sand the surface smooth. Brush off whatever you can with a small whisk broom, then use the scraper provided in the kit to go over all the surface areas. Be careful here - it *is* possible to pull off chunks of paint and base coat that will need to be retouched. Then use the diamond embedded sanding block to sand the counter smooth. (The coarse sanding block I bought at Lowe's did work really well here, so Gabe and I were able to work together.) Use the fine sanding block on the edges and the backsplash to blend them in to the rest of the counter. They tell you to match the counter top smooth level to the sample they give you. Honestly, I don't think it's possible to get it THAT smooth without sanding right through to the original counter. Get it to where you're comfortable with it and be done with it or you'll make yourself crazy. Also, the front edge and the backsplash don't have to be as smooth as the surface. Leaving a little more texture here is okay. Inspect the counters thoroughly for any bare spots and touch them up now. Use a damp sponge to dab on the base coat, then throw enough chips on to cover it. You have to let these spots dry for at least four hours, then sand them down even with the rest of the counter. We started this around 3pm, and it took us about 90 minutes to complete this step. We then had to wait four hours for the touched up areas to dry. The hard part is cleaning all the sanding dust and excess chips off the counter. We went through so many cloths... I only bought one bundle, and I wish I'd had two. I would recommend tossing each one after you've used it because each damp cloth makes sanding dust paste. Trying to reuse it a second time didn't work so well but we had no choice. We wiped each section down about five times before we felt everything was clean enough for the top coat. Make sure the counters are thoroughly dry before applying the top coat. You'll apply the top coat in basically the same manner as the base coat. Use a paint brush to do the side edges and the backsplash, then use a roller to the front edge. Use the brush to fill in any areas the roller can't reach. Be care not to leave globs, drops, or extremely noticeable roller lines. They will dry in place and be visible afterwards. We started this step around 8:45pm and we finished in less than an hour. This is the only part of the project that is EXTREMELY smelly. The top coat has a very strong odor, and this presents a bit of a challenge because you can't open any windows or ventilate the space while applying or drying. We made the mistake of applying the coat at night, around 8pm, and had to leave our bedroom and living room windows cracked all night because the smell was so strong. As a result, the counters were still sticky and tacky this morning because it was so cold in the house. I'd recommend applying this in the morning on a nice day so you can open windows to ventilate once you're done AND still have the temperature adequate for drying. Day Four: Sunday Wait until the counters are no longer tacky to remove the painters tape and protective sheeting. Score the edges of the tape with a chisel or blade to make it easier to peel off so you don't pull off any pieces of the countertop. Miscellaneous Tips: This project could be completed in less time than we took, but because of work schedules, we planned to spread it out over a few days. If you time it right, you can get it done in less time. Just don't rush it. All of the online reviews tell you that one fault of this kit is the amount of base coat provided. Always overestimate your square footage and underestimate the coverage area on the box. We have roughly 35 square feet of countertop, so we bought the kit for 50 square feet. We had enough base coat, with enough left over for touch ups as needed. Make sure you have secured the plastic to the floor. These chips will go EVERYWHERE. We draped it down from the base cabinets, but we didn't tape it down to the floor and clean up was a bit of a mess. If you have the space for it, pull your appliances out away from the countertops. I wish we'd pulled the fridge and stove out because getting the tape off of these, out of the crevices, we challenging. I always think of painters tape as my safety net and I'm not particularly precise when painting edges as a result. That was a mistake here, because these are very goopy materials. Trying to pull the tape out of the corners when everything was dry was problematic because they were weighed down by the equivalent of road tar. We made the mistake of applying the base coat and the top coat at night, when the lighting in our kitchen was less than ideal. It was very difficult to see what we were doing and we were dependent on our flashlight to look for areas we missed. Try to do these steps during the day when you have ample natural light. Wear your safety gear!!! Glasses, gloves, and a dust mask are most definitely necessary. You're going to get hot and feel suffocated but you don't want to be breathing in all that dust, and if you wear contacts, you do not want this getting into your eyes. Additionally, I didn't have my dust mask on the whole time, and Saturday morning I had to blow my nose constantly to purge the dust and paint chips from my sinuses. Throw the lint-free cloths away when you're done with them after each stage. There is so much sanding dust embedded in them that you'll just make paste if you try to wash and reuse them. Inspect your countertops very carefully. We are now noticing a few areas we missed after sanding, but we can't touch them up now. We know no one else will notice them, but we know they're there. Take your time. Don't rush through any of the steps or the process as a whole. It will be worth it when you're done. There will be imperfections, as there often are with DIY projects, but no one else will notice them. Most of ours are along the backsplash, and since we're also going to be painting the kitchen, we're confident we can cover them up and/or make them even less noticeable. Overall, we definitely recommend this product. I ordered the kit through Amazon.com and got the large kit for $195. We probably spent another $50 on tools and materials (plastic, tape, paint brushes, etc). When you compare the cost of brand new counters against a financial investment of $150 and some sweat equity, it is SO worth it. We LOVE the way the counters look now. We installed a new sink and new faucets today to tie it all together and we think it looks fantastic. Rustoleum Countertop Transformation gets two thumbs up from us!
N**N
Highly recommend - easy to do - LONG review with tips
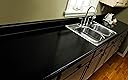
Background/Experience: Two twenty-something ladies with no prior home construction experience minus the basics such as painting a room, ripping up carpet, light furniture refinishing/painting, laying stick-on tile floors, etc. I'm a first-time homeowner. This Project is Best If: If your countertops are in decent shape but you just don't like the color/pattern/finish, this project would work great for you. If you don't like your countertops' shape, it probably isn't for you. This project works best in a middle-of-the-road home where granite isn't expected. It also was a manageable project because I didn't have a huge amount of counter space (12 linear feet, about 26ish square feet when including backsplash and front edge). I'd equate the finish to a new laminated countertop with a โstoneโ look such as an HD laminate. I think this project was a great way to avoid the hassle of a new countertop install and also it was about $300 cheaper and less wasteful in not getting rid of a perfectly good countertop. (I estimated new laminate to be about $600ish installed and this cost me $300ish total โ note, I WAY overbought, see below). My countertops were less than 10 years old when I did this and had only light shininess โ I bought a new house and just wanted to update the color and pattern. What You Need/Should Have that is NOT in the Kit: 1. A partner 2. ShopVac or regular vacuum with brush attachment 3. Dropcloths 4. Painter's Tape 5. Flashlight or High Powered Work Light 6. Foam Roller (small) โ get two 7. Nap Roller (small) โ get two 8. 2 brushes โ Be prepared, you may need to throw them out following the clear coat at the end, this stuff is incredibly sticky) 9. Two separate paint trays โ I used disposable 10. putty knife/sharper knife/edge 11. Tweezers โ to remove any arrant fuzzies/tiny hairs that might enter the top coat after putting it down, when you go to score the tape and remove it 12. Damp sponge Tips โ What Worked Well for Us: BEFORE 1. Read all the reviews and watch every single video you can find online. I had been looking at this product for over a year before I did it. 2. Choose your color carefully. People have said the Onyx looks terrible โ like black asphalt because it is all one color. Whatever you buy is going to dry darker and shinier than when the color chips are on and then sanded. I would go with โDesert Sandโ (tan) or โCharcoalโ (gray). We did Charcoal and it looks great โ it's the color chips that make a difference. 3. Overbuy by a LOT โ Every review says you don't get enough base coat in the kit. I have 12 linear feet, aka, about 26ish sq feet. There are TWO kits available: Small โ for 10 linear feet or 25 square feet Large โ for 20 linear feet or 50 square feet Here's the weird thing โ when I got the boxes in the mail for the small kit, they were labeled โ12 linear feet or 30 square feetโ I am not sure if this is the new or old quantity or if they have kept the package the same and just been more conservative with the amount that it does, etc. Because it was listed on Amazon as being 10 linear feet or 25 square feet and I have about 12 linear/26 square, I knew I could NOT push it with one small kit due to everyone's complaints about base coat amount. So I had the choice โ buy one large kit or two smalls. One large would have been cheaper by about $80 BUT I bought two smalls to get two times the amount of materials (so my helper could help me work). This is a very smart idea and I'd recommend two smalls or heck, if you are between sizes, a small and a large or even two larges. BUY DOUBLE what you need just in case โ you can always return an unopened kit, I would imagine. Okay, so I get the kit and it's marked 12 linear/30 square despite it being 10 linear/25 sq online. I found that to be dead on accurate for me, going from tan original to charcoal. I had JUST enough base coat without even cracking open the materials in Kit #2, provided I used the can and scraped it for touchups. (Not sure if they increased the amount or what due to complaints, my kit actually did a little MORE than it was supposed to) I am keeping the other kit for any touch up needs in the future. I did use the materials from it (sander, scraper, diamond block). It was nice to have peace of mind to know we had plenty if something went wrong. 4. Watch the entire video the whole way through first. Then have it going and pause it before doing the next section each time. DURING 5. This says โin a weekend.โ I think that's overestimating the time this takes. I'd say total, it took me at MOST 8 hours from opening box to touching up paint in my kitchen, spread over three days (Friday โ prep, sand, base coat, chips, finish at 12 midnight; Saturday โ started at 12noon with vacuuming, wiping, wiping again, drying, touch ups, waiting, touch ups again with no waiting, clear coat, inspecting, touch ups โ finished at about 7pm, then let dry and remove tape at 11pm and touch ups again, finishing at midnight, Sunday โ letting dry and fixing up kitchen wall paint and cleaning) . You can't use your counters for a week. You COULD do this project after work two consecutive days if you had 3-4 hours in there. 6. At the end of each step, we carefully went over each inch of the countertop with a high powered work light, two of us, and were anal about each and every spot, inspecting it, etc. 7. Move your stove out or fridge if it abuts the countertop. 8. Do a round of โtouch upsโ before every step โ you need to see if any other spot needs more sanding. Okay, we vacuumed, does any other spot need more base coat and chips? Anywhere just need some more chips? Okay, we just put topcoat on, does any spot need more? Even though we already did topcoat, do we NOW see a spot that needs more base and chips and a touch of topcoat after removing the tape? Etc. 9. We prepped our chip bags by opening and wetting agent before putting on base and kept a close eye on the clock. 10. Expect to have to touch up your wall paint a decent amount when you are done if you are up against it with your countertop. 11. Don't wait too long to remove your tape and you MUST score it carefully. 12. The chip spreader wasn't great for us, we had trouble with the angle. We ended up hand throwing a lot of chips and in a few places, PRESSING them into the finish on a patch or trouble spot. 13. It's a two man job. If you can, work during the daylight. We couldn't do this because it was early winter and dark early โ so we used a high powered work light. 14. Remembering that it is a money back guarantee if you don't like it and that I already didn't like the current counter tops helped me keep an open mind โ what's the worst that could happen, we start over with new counters! I almost backed out, I was really scared by the reviews, but am so glad I did it! 15. Follow directions to the letter. This is really easy and could be a fun project for an adult and kids together โ just need attention to detail. If you have one really picky person, let them join in and help to make the result perfect. 16. There will be roll marks in the top coat โ it's inevitable and not very noticeable. 17. On the base coat step, it will be very frustrating to try to brush on the backsplash as every swipe fills in a bare spot, but takes some of the paint off an adjacent area -it's like it isn't sticking or something. Just keep going and do your best โ it all worked out in the end. Tips โ What We Should Have Done 1. We should have been MUCH more careful with the wetting agent. I oversprayed and chips stuck to my wall in a few spots. I used elbow grease to get these off but some remain. Only spray it on the counter. 2. If you have cheaper cabinets like me (some parts, such as sides normally hidden by appliances, that are MDF), be VERY careful adhering tape. BARELY touch it or consider skipping that side. I did my tape lightly and it STILL tore off a piece of the cabinet finish on the sides. 3. We vacuumed a lot BUT I would advise really, really watching the pet and human hair. We changed our clothes before going in to work on the kitchen and didn't let the dog in for days or near us with our work clothes on. Tie up your own hair and lint brush yourself before going in too. 4. Take your curtains down if they are anywhere near the counters. I didn't and got paint on them. 5. Wear tight-fitting clothing (no loose shirts to drag on the front) and have a stepladder available for getting some hard to reach places without leaning on the front of the counter. 6. Practice with the chip spreader before you start to spread so you can see where it is spraying. 7. When sanding and scraping, watch your counters' high points and constantly, constantly check to see if you have scraped too much. 8. The clear coat will ruin the tray it is in, the paintbrushes, the rollers โ it is basically glue. So be prepared to throw these items out and replace them. 9. Keep a little base coat back for touchups. Then, when you have applied the top coat, keep a little back for touchups, watch the clock like a hawk, and RIGHT at the four hour mark, score the tape and remove (earliest you can remove the tape, latest you can possibly use top coat which is 4 hours after mixing) and touch up then. 10. If you just bought a house, do this BEFORE moving in, before pet hair or human hair or dust enters the house. If not, get ready with your tweezers to remove any speck of hair or lint later on. 11. If you have multiple sections of countertop (I don't, mine run continuously), you can do it in pieces and probably get more experienced as you go along. 12. You could probably jury-rig up your own kit by buying materials on your own for WAY, way less. But you do pay for the convenience and the guarantee . If I was a more confident DIY'er, I'd probably make my own kit out of original materials. Tips โ What Didn't Seem to Matter 1. I didn't remove my sink. I am going to keep my sink a long time. This seems to be okay because we taped it pretty well and even plastic-bagged the entire thing for the first chip spreading round. 2. Patch drying time โ you are supposed to wait 4 hours and on the first round of patching (between chip cleanup and topcoating), we did. We then found MORE places to patch and still MORE places to patch after topcoating. We didn't wait 4 hours on Patch Round #2 or #3 โ we put down base, chips, and clear coat within 2 minutes. 3. I didn't find it to be that messy. I taped up my cabs pretty good and put plastic sheeting and old rugs down, then Shop Vacc'd everything up โ it's messy but not horrifically like I expected. 4. For fear of sanding too low, I didn't do my finish as smooth as the sample โ I kind of kept it a teensy bit rougher as it would be with an HD laminate. Go to a store and see a new laminate that has the โstoneโ texture, not just stone print, with teeny raised pieces โ I sort of copied that. The sample is on a different material than an actual countertop/laminate and so it is not really accurate. 5. I didn't silicone caulk my sink yet โ I think that might be a great touch and help cover any errors near the edge there, but it hasn't been necessary for me. 6. I didn't putty my seamed edge. My edge seam was already really, really flush in a corner of my kitchen where they meet, and I felt puttying it would draw it out more and make it more visible. Again, my original countertops were relatively new and very professionally done. 7. I didn't wear a face mask or gloves. The top coat did burn slightly on my hand, but it was very mild. Update: I will come back and update on the durability of the product as I am just two days past when it was finished. I hope to get 3-4 years out of it before upgrading my countertop.
A**A
Good product if you know how to follow instructions to ...
Good product if you know how to follow instructions to the last detail and have some handy man skills to begin with (common-sense included). A bit overpriced I must add. This was my first ever DIY project (in my first condo I ever owned and became poor in the process so had no money for anything else). This in probably NOT for first timers. Please watch the accompanying DVD multiple times before even starting, as you need to time yourself well to get done with this in appropriate time frame. It clearly mentions that counter-top should be in good condition before considering Rust-Oleum transformation, essentially meaning if you have a very bad/ damaged counter-top; you better get a new one. Most reviewers have covered most of the essential Do's and Don'ts of the process, here are a beginner DIYers 2 cents. 1) Painters tape needs to be stuck EXACTLY, and should not cover surface to be covered with base coat even by a millimeter. It becomes difficult to remove it later, and may create difficulties while removing the tape/ caulking edges post process etc. Sanding tool is really good, but I think orbital sander can do the job equally well. 2) PLEASE WORK IN SECTIONS, don't think you can paint the whole counter-top at once and cover it with chips in 20 minutes or so, the time in which the base coat starts to dry and the wetting agent is more or less useless. Base coat needs to be THICK. 3) Be prepared to find the chips for a couple of years to come from various places in your kitchen. They WILL find their way everywhere. about 60% of them are probably not even going to make contact with the actual surface with the base coat. Cover EVERYTHING that you can, including yourself, your fish-tank and your dog (even if they are not supposed to be in kitchen). 4) Most tricky places are back panels, and edges where panels from 2 walls meet. If they are at different heights due to poor previous workmanship, you are in bad luck. Behind the sink area is another problem area, and if possible, remove the sink. 5) You can NEVER sand it enough to match feel of the sample in the kit. 6) I had a couple of black spots with practically no chips stuck to them, and I was somewhat able to repair them by re-sanding and re-paiting/ re- shower with the chips and re-smoothing. overall results are uneven, but miraculously mimic real stone more than other surfaces which were very even. (May be I am just making myself feel good) So overall: I achieved acceptable results despite very poor skills and not following the instructions to the last letter. The finish does look a lot like real stone. Still four stars as it is NOT a simple process as the commercial makes you believe, and it is definitely overpriced. I will revisit my review a few months down the line to update about how the surface holds up to brutalities it will face with Indian cooking.
A**.
Great upgrade for laminate countertops
I recently used the "Java Stone" kit to update the stained white laminate counter tops in my kitchen. As other reviewers have stated, this won't fool anyone into thinking you've got stone or granite, but it's certainly nicer than the plain laminate we had before. "Upgraded laminate" you might say. The Java Stone is a much nicer color in real life than the color swatch on the box. It has almost a purple-brown hue to it in some lights, but I think it would compliment just about any decor. We have white cabinets with brushed nickel handles/pulls and stainless steel appliances. It looks good. Several reviewers have mentioned that there is not enough adhesive and too many chips for 50 square feet. I did NOT have that problem. I had slightly less than 50 sq ft of counter top to cover, and we had enough adhesive and I actually almost ran out of chips. I could be the exception to the rule, just maybe don't open the 2nd box if you buy it until you absolutely need it. Plus I don't think they make the small kit in Java Stone. As other folks have suggested, make sure to watch the video and read all the instructions... and get a 2nd person to help you. I think it could be done by one, but... work smarter, not harder. Also, several people said they used a random orbital sander with 60 grit paper to rough up counters and/or sand down chips. We did the same thing and it saves a LOT of time I think. Just to be safe, I did go back over my naked counters a bit with the diamond sander block to make some deep scratches. The regular sanding block that comes with the kit is junk, it will rub away to nothing in minutes. The only problem I had was patching up light or underchipped areas. The kit suggest that, after the adhesive and chips are dry, if you see an area that needs better coverage to just roll on more adhesive and throw chips and let it dry. We did this in a few spots and it looks AWFUL. Here's why: When you do this on top of a "light" area, you're making it taller than the surrounding counter, so when you sand it down to make everything level, you basically sand through your chips and have a spot of mostly adhesive that doesn't match the area around it. You could avoid this by not sanding it level, but then the counter might have a bump... So now we have several spots that look crappy. But that's ok, they are conveniently located where I always keep a cutting board or appliance. In hindsight, I think it would have been best to sand the lightly covered/underchipped area down to the bare counter before patching. I did not try this, so I'm not sure if it would work. Take care to do a VERY thorough examination of the surface before you put the glossy topcoat on. I thought I did a good job, even using a flashlight to go over every inch, but there are still spots were a few specks of the original white counter showed through. Oh well, I'm sure I'm the only one that notices. Overall, I'd say this is a great product, and I've definitely been recommending it to my friends. Amazon had the cheapest price that I could find: $207 (I think) vs. $250 at Home Depot and Lowes. Good stuff!
C**S
Who knew my counters could look so good for so little money (and a bit of effort)?
After much research and review online, we ordered this product in Java Stone color to refinish existing Formica countertops with wood trim edges. Package arrived as promised, including all materials in good condition. Bottom line: We were skeptical the product could produce the promised results, and we were quite pleasantly surprised at the outcome. A huge improvement over our existing counters, covered and camouflaged many minor flaws, definitely an upgrade worth the cost of the kits. CONS: It IS a messy process. The drying time is tough. Doing without kitchen counters for 48 hours (initial drying time) and regular use for 1 week (complete curing time) is a pain. Corrections (due to missed spots or oversanding) take extra time and aren't always invisible afterwards. Directions tell you to work in sections but don't warn you of creating seams (this happened in one spot on our counters). PROS: Our counters look immeasurable better! The surface is deep and rich--much more like granite than I could have believed possible. The surface seems durable and functional. Saved thousands over replacement countertops & installation. VERY happy with the result. Be patient and careful, but don't panic. The instructions and video provided are very helpful and thorough. We watched it more than once, and found the application to be just as described in the instructions. The Java Stone color is only available in the large 50 sq ft kit (our kitchen is only about 30 sq ft) but we were glad to have plenty of material to work with.
D**8
The Saga of the Countertop...
Beware...this project is for artisans. I am used to doing things perfectly, and this countertop project is a serious challenge. You can see where I started and where I finished, as the quality improves exponentially with experience (from one area of the kitchen to the other!). This kit is not like the cabinet transformations...any idiot can do the cabinet transformations...this is another ball of wax. With the cabinets, the final coat glossing is the tricky part. Not so with the countertop kit...the base coat is the challenge...and the sanding too. You actually have quite some time with the sealant here and you can take your time somewhat. Also, PURCHASE AN ELECTRIC CIRCULAR SANDER to avoid early-onset osteoarthritis. The most important advice on the DVD is to "lay it on thick"...the base coat that is. Would I attempt to do this project again? Maybe not...it's just too difficult, and at the end I felt I couldn't really produce a perfect result...I'm too picky and self-critical. Cabinets yes, countertop no. The one big complaint I have about the instructions is that it does not explain how to merge areas of long countertop. You have to use painter's tape and create a straight edge and then....oh, hell, you figure it out. I did and made mistakes. You can't do this project without beer. Two people don't really make it easier either...it just causes a divorce. Tell the wife to get out of the house and go to the mall (but take her credit card). The good thing is that now I am an expert...but I no longer have use for this rare skill. Also, make sure your kit is fresh...mine probably sat around a warehouse for months and the base coat got like a gel...just another unplanned disaster. And you will go through multiple kits to do your one project. You need more than the recommended number of kits. And ONE diamond sander? Ha ha ha ha ha ha! Life is short...don't start this silly project. Just rip out your old tacky countertops, split them up with an axe and burn them. It's always fun to burn crap. Now that's satisfaction. And don't watch "Househunters"...it just proves that wives and girlfriends want everything perfect in their new house, especially a photogenic kitchen...regardless of their ability to cook! Men, don't be duped into cooking by your wife or girlfriend...they are supposed to cook! We are supposed to mow the lawn and watch football.
D**F
Reward for Bravery
We started out our kitchen remodeling project by getting quotes for counter replacement with a granite laminate. We received some quotes and were seriously considering buying the laminate counter top. Our daughter suggested that we look at the Rustoleum counter transformation kit. We watched the video, checked the prices and figured the product was worth trying. If we did not like it, we would replace the counters with the laminate. We read several of the reviews which were very helpful. Our counter surface area is approx 50 sq ft, so we decided to buy 2 of the Java Stone 50 sq ft kits. We were very glad that we bought 2 kits because we used one an a half cans of the base coat. We had more than enough of all the other materials. Our only complaint with the product is that Rustoleum does not provide enough base coat to be able to cover the sq ft area that they advertise. Other helpful tips were to use an orbital sander to sand the old counters and to sand the base coat with chips. This saved a lot of elbow grease. Another tool that was very helpful was a foam drywall sanding block that was wedge shaped on one edge. This made sanding the pencil edges of the counter top very easy. Another labor saving tool is the shop vac with a brush attachment. Using this to pickup the sanding powder was much easier than trying to wipe up the powder with a cloth. To prep the area, we removed the sink, pulled out the refrigerator and stove/oven. This made working on the counters much easier and avoided getting the base coat and finish coat on the appliances. One thing we wish we did was remove the contents of the cabinet drawers. The chips and dust manage to get everywhere. Overall, we are very pleased with the look an feel of the counter tops. The color is very close to the pictures we saw on the web site. The instructions were complete and easy to follow. We saved a good chunk of change doing it ourselves. Time will tell if the material holds up as well as the laminate.Overall a very good product.
L**3
Great for someone who wants to update the look on a budget
So I'm a first time home buyer and that means not a lot of money in the bank to redo the kitchen. Of course they had green formica counter tops in a swirl pattern. I searched and searched for an option when I came across this. Lots of reviews. People said many good and bad things. I wasn't sure the amount I would need so I bought 2 kits based on reviews saying there wouldn't be enough base coat. That actually ended up being too much. My goal was to complete this in a weekend. Well it took me from Friday night after work until Monday night after work. Prepping after work Friday and putting the top coat after work Monday. The hardest part was sanding the counters with the diamond encrusted sander. It was all by hand. That took a total of probably 3-4 hours of sanding, wiping, checking, sanding, wiping, checking and so on until I fjnally couldn't see much of a sheen left. The rest was a waiting game. Unfortunately I missed a few spots so after waiting over night Sunday and completing the next steps, I ended up having to go back and fix some spots. To me they are noticeable and don't blend as well (I'm probably too hard on myself) but to anyone who walked in and saw them, they wouldn't notice. I had help with sanding and the first time I put the base coat and chips on. Everything else I did myself. Clean up was a bare, I put plastic every where but the chips still got all over the place. Shop vac would be very helpful but I had to do everything with a broom and dust pan. Around the sink was tough and a few spots show through. Again I am probably the only one who can see them. I still need to caulk but I am pretty impressed with how they turned out. A little paint and changing the knobs on the newer cabinet doors that were already installed before I bought it, and the kitchen looks much more updated. Everyone who comes by can't believe how great they look! I actually have some base coat left and tons of chips, so the other reviews stating there wasn't going to be enough base coat (causing me to be 2 kits that I really didn't need) were wrong. I was hesitant to try this at first but figured that worse off I return it for a refund and buy another cheap formica if things went wrong. But to my surprise it wasn't as bad as I thought and they turned out great. I would recommend this to anyone on a budget who wants to update the look of their kitchen for cheap. I will continue to save my money to one day redo the entire kitchen, but for now I'm content with what I have. On to the next project!
C**P
Love it
Transformed our counters perfectly
J**T
Five Stars
Super good product amazing job and dvd
Trustpilot
2 months ago
1 month ago