Desertcart purchases this item on your behalf and handles shipping, customs, and support to Colombia.
๐ Transform your Switch with style and precision โ because ordinary is overrated!
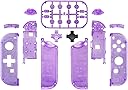
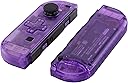
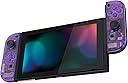
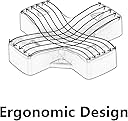
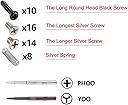
The eXtremeRate Clear Atomic Purple Joycon Housing is a premium DIY replacement shell designed for Nintendo Switch and Switch OLED Joycons. Featuring an ergonomic D-pad for improved gameplay, it comes as a full kit including all buttons, screwdrivers, and spare screws. Crafted from durable ABS plastic in a striking clear atomic purple finish, this housing elevates your consoleโs look while requiring moderate electronic installation skills supported by a detailed YouTube guide.


| ASIN | B07YHYZM4K |
| Best Sellers Rank | 5,880 in PC & Video Games ( See Top 100 in PC & Video Games ) 32 in Nintendo Switch Hand Grips |
| Box Contents | No electronic information stored |
| Brand | eXtremeRate |
| Brand Name | eXtremeRate |
| Colour | Clear Atomic Purple |
| Compatible Devices | Game Consoles |
| Compatible devices | Game Consoles |
| Country of Origin | China |
| Customer Reviews | 4.2 out of 5 stars 3,525 Reviews |
| Enclosure Material | Acrylonitrile Butadiene Styrene (ABS) plastic |
| Form Factor | Cover |
| Form factor | Cover |
| Item Dimensions | 15.5 x 11.5 x 5 centimetres |
| Item Weight | 100 Grams |
| Manufacturer | Extremerate |
| Manufacturer Part Number | JZM505 |
| Material | Acrylonitrile Butadiene Styrene (ABS) plastic |
| Model Number | JZM505 |
| Product Features | Replacement housing, transparent design, D-pad |
| Shell Type | Hard |
| Shell type | Hard |
M**6
Looks great! Don't buy separate screwdrivers but you will need tweezers.
Patience, time and steady hands. Three things needed to make this a success. The shells are of great quality (I chose the NES themed black shells with a dpad configuration) and they look great and feel very comfortable. They include a screwdriver which interchangeable heads for Phillips and the Tri type. There are a few reviews on here that said the screwdriver stripped the Tri screws. I believe that the screwdriver supplied (interchangeable heads rather than 2 separate screwdrivers) are the new issued version which is supposed to rectify this issue and I certainly had no issues with it. My advice is to go carefully, line up the shape, apply a good amount of pressure whilst unscrewed, this will still the screwdriver to become unseated and stripping the screw. No need to buy separate screwdrivers. The YouTube video signposted has an incorrect instruction which is in the title but I almost missed it so bear in mind when when watching it. It took me about an hour to do both joycons. I have no prior electronics experience and is the first time doing something like this. I would not have been able to do this task without some nose tweezers - I would suggest you buy a separate tweezers for this job. Search for ESD 15 tweezers and those are the pair that you need. I needed them to pull out and reattach the ribbon that you need to do as part of the task, I have small fingers but I don't think even the slightest of hands could reattach the ribbon without tweezers. Would also advise being careful when you open the joycon, I used a credit card to carefully snap it open so I could just fold it like a book like the video. Try doing this with just your hands and you risk ripping the ribbons and destroying your joy cons.
S**T
Look great
Not so easy to put together but if you got the patience they look great
I**L
Acceptable, I like the transparent look
Installing these was a bit of an effort. Lining up the buttons correctly is ideal otherwise youโll be opening it up again like I did (see image with misaligned < A). I damaged a three inside which meant a screw came out and had to open the case again and glue that screw in. I donโt think the buttons that come with it are very good quality and I only used the z ones and the d pad (you have no choice as itโs different from the original case). I used the black ones from the original jojcons otherwise. It would be great if you could work on meeting the same quality as the Nintendo ones. Buy double sided tape or fold over tape to create a double sided effect with this to keep the battery in place.
E**T
Fantastic replacement shell and a perfect dpad to boot
Such a fantastic shell replacement, the dpad alone is absolutely brilliant and the perfect replacement for those ridiculous directional buttons. The install was crazy easy, just slightly fiddly due to the tiny screws and small ribbon cable attachments. Honestly, after the reviews here and the sales description I was expecting a nightmare install but reality was the complete opposite. Each 'Con took less than an hour, going steady and accurately, and the end result was something legitimately indistinguishable from a genuine Nintendo Joycon... except far better looking and feeling :) Also, there were no bulge issues with the right JoyCon either, no need to shave any plastic notches. I'm guessing this is a v2 kit as it even came with a v.good magnetic switchable screwdriver set too. I genuinely couldn't recommend this any harder, it makes such a phenomenal improvement to the functionality of the left JoyCon and the overall aesthetics are much more visually pleasing. I love it, and the price was excellent too. Next step; ExtremeRate Switch shell replacement too ^_^ I'd add some photos of the finished product but it won't let me, sorry :/
E**H
Much better quality than other aftermarket shells
Bought these to replace the cheap, splintering shells that I put on my joycons a couple of years ago. The plastic has a nice, slightly matte, texture and feels relatively high quality. I had no issues with pieces fitting together like I have with the other shells. I think the look is pretty good. Next time my sticks start drifting I think white replacements will complete the look! The process can seem intimidating but having done it a few times now the main thing is just to make sure you know which screws came from where and make sure that the buttons and rubber pads are all lined up properly before you screw everything down.
A**S
Looks good but not worth the time!
Like lots of people I like to customise gaming in as many ways as possible, when the order turned up it looked amazing and the idea of installing it is exciting but getting half way into building it you begin to realise how complex and fiddly assembling this is. Itโs incredibly frustrating and just not worth the time, Iโm yet to finish reassembling it and may just end up buying a new joycon as my current one is in pieces and near enough impossible to put back together.
D**H
The best by far. Excellent D-pad
Having tried some cheaper shells on from Ali-express, I have had experience of other companies' attempts at this and I can say that these eXtremeRate shells were leagues better than the others. If you haven't modded joy cons before, it will be challenging, as others say. But if you take your time and watch a few videos on YouTube before attempting the reshell, you should be good. The provided screwdrivers with products like this are usually terrible and lead to stripped heads on screws and they often wear away after a few uses. The same can't be said for the provided multitool this time. It's a quality-feeling, part-metal screw driver with a revolving top and two interchangeable driver heads. (a Philips 00 and a Y /Tri-wing 00) The D-pad's design is exactly as 'ergonomic' as the manufacturer states. It feels great playing 2D platformers and retro titles, especially compared with the original directional buttons of the left joy con. The only possible down side to the product is its finish. While the "soft touch" does feel nice in the hand, it can attract smudges very quickly and they aren't easy to wipe down. A minor niggle, but definitely worth mentioning if you're replacing your shells for the sake of aesthetics. You might prefer the hard plastic instead of the soft finish. A great product overall. I paid around ยฃ15 and I'd pay as much as ยฃ20 for a decent D-pad solution like this. The colours are just a bonus and the quick delivery offered by Amazon is worth forgoing any saving possible through the large Chinese reselling sites.
M**N
Great shell let down by quality issues
The shell is really nice to look at; the coloured buttons and d-pad remind me of my old SNES, and the materials are great quality. Unfortunately, the front and back pieces don't align perfectly when screwed together, leaving a sharp edge that's uncomfortable to hold.
A**A
Ho sbagliato prodotto come devo fare
Ho sbagliato prendere il prodotto sono troppo piccoli
่ง**็ป
่ชฌๆๆธใจใใชใใ
ใฉใใซใๅใไปใใใใใ ๅคๅฐๆ ้ใใใ(็ฌ)
M**S
Challenging install but great product!
These look great. I had two matching pairs of boring grey joycons. Now one pair is a grey transparent with colourful buttons! Installation was tricky (which I kind of enjoy - working on small electronics is satisfying for some people!). I broke one joycon while installing - I think I must have shorted out the main board on it. Take your time installing! The right controller is much more complicated than the left, so maybe start with the left and figure out what you're doing then go to the right one. Fortunately a replacement joycon was inexpensive on ebay and on my second try they both seem to work great. Installation was not a fault of this product, they supply replacements for all of the screws and springs, as well as good quality (especially for the price) screwdriver and bits for the job. Would do this again! Would just be a little more careful the first time! Thanks !
N**O
Just perfect
The shell swap was really easy and it turned out perfectly. The design turned out better than I imagined it and I am so glad that I got these shells. My Switch looks so much more unique now!
S**N
Look and Feel great, and not as hard to install as most say
This was my first ever experience opening any electronics up, and basically even using a screwdriver aside from a few occasions. I have to say that this process is not nearly as difficult as many people have said. If you are careful, everything should go smoothly. Here are some tips that made it easy for me: 1. Use a better set of screwdrivers and get some tweezers 2. I found that these screws aren't too bad to work with but be careful not to strip them. I had worse look with the screws on my switch itself then in the joycons. Once you have the Nintendo ones out, switch them with the replacement screws. They strip less easily and are Philip's head. 3. Layout tape on a piece of paper in the shape of a joycon (small rectangle). I played out three of those, representing the outer, middle, and bottom layer of the joycon. Each screw I took out was placed on the tape, in the same position that they'd be placed on its respective layer. This helped keep all the screws organized, and made reassembly a breeze. 4. One of the difficult parts of this process is fiddling with the delicate ribbon cables. I simply didn't undo any of them, and I unscrewed everything. Once it was all unscrewed, I transferred over all the insides into the shell in one piece. You have to be a little careful moving it. It is also a little harder to work with since you have all the parts dangling around, but I preferred that then dealing with the cables. As for the product itself, it feels very high quality and nice to the touch. It's defintely on par with nintendo's quality. If i saw these at someone else's house, I would believe they were an official nintendo product.
Trustpilot
2 months ago
1 month ago