


Buy anything from 5,000+ international stores. One checkout price. No surprise fees. Join 2M+ shoppers on Desertcart.
Desertcart purchases this item on your behalf and handles shipping, customs, and support to Colombia.
♻️ Turn waste into wonder—compost smarter, not harder!
The FCMP Outdoor IM4000 is a Canadian-made, 37-gallon dual-chamber tumbling composter crafted from 100% post-consumer recycled polypropylene. Its innovative 8-sided design allows continuous composting by alternating chambers, while deep fins and aeration holes accelerate decomposition. Built tough with UV-inhibited plastic and a corrosion-resistant galvanized steel frame, it offers a sustainable, low-maintenance solution for transforming kitchen and yard waste into rich, garden-ready compost in as little as two weeks.


| ASIN | B009378AG2 |
| Best Sellers Rank | #12,004 in Patio, Lawn & Garden ( See Top 100 in Patio, Lawn & Garden ) #1 in Outdoor Composting Tumblers |
| Brand | FCMP Outdoor |
| Brand Name | FCMP Outdoor |
| Capacity | 37 Gallons |
| Color | Black |
| Customer Reviews | 4.5 out of 5 stars 18,749 Reviews |
| Global Trade Identification Number | 00628344138847 |
| Item Dimensions L x W x H | 30"L x 28"W x 36"H |
| Item Type Name | Tumbling Composter |
| Item Weight | 28 Pounds |
| Manufacturer | Forest City Models and Patterns |
| Manufacturer Part Number | IM4000 |
| Manufacturer Warranty Description | One (1) year limited replacement warranty on manufacturing defects - if anything is missing or damaged upon arrival please contact the factory and we can replace what is necessary. |
| Material | Polypropylene |
| Material Type | Polypropylene |
| Model Number | IM4000 |
| Product Dimensions | 30"L x 28"W x 36"H |
| Shape | Octagonal |
| UPC | 018717049045 095229221503 043973799236 653836979141 768505690095 628344138847 044914791357 728615630220 730309192938 887682116553 741435462925 699178247968 |
| Unit Count | 1.0 Count |
A**S
Good product, fantastic Customer Service
I bought this unit as "used, in very good condition" from Amazon Warehouse. As far as I can tell when received, it was never actually used. Someone appears to have taken it out of the box and then returned. All the parts were in there, although as I was assembling it, I discovered that two panels were broken. More on this later. The unit is reasonably easy to assemble once you figure out the somewhat cryptic instructions. To be fair, the skimpy instruction manual refers you to a video on the web site which I assume shows the assembly process in greater detail. I didn't look at it, and after a short while, I figured out the right way to put it together. Be warned that there are lots of screws to place. Lots! Also, it is very easy to assemble the supporting bars in the wrong order, and again the instructions are not terribly clear in the manual. Other than that the assembly process itself is not too hard. Once I got the unit together, I found that the composter stands sturdily enough,and seems to be working. Mine will probably need at least two to four weeks more before it produces anything recognizable as soil, but there's certainly activity taking place in there. It's also a lot less messy than my original standing square-box composter. Now, regarding the pannels, I wrote to the manufacture's support address explaining the situation, and asking whether they could send replacement panels. Remember that I got the unit as "used" from Amazon Warehouse, and so I thought there might be a chance that they could refuse to honor the warranty, in which case I more than half expected that I would have to return the whole thing back to Amazon. I was very happily surprised when they replied within a day, letting me know they were shipping the replacement panels. However, I was then further happily shocked when the panels arrived (plus the whole set of screws as well!) within two days, to Puerto Rico! (normal shipping for most of the stuff I buy only usually takes at lest 5-7 business days! I am happy with the composter, and I am extremely happy with the customer service. The instructions could definitely used some improvement.
N**L
Well built but requires care in assembly
Quality is solid, but I wish they would have used galvanized hardware and nylon lock nuts for ALL the hardware. The black oxide screws are sure to eventually rust. Assembly tips: 1. Watch YouTube videos and go to the product website before starting. Study "composting tips" in the provided instructions. Fill the composting tumbler 50-60% full for optimum performance. 2. Have a medium size flat-bladed or box-ended screwdriver, 3/8"/10mm box end wrench, and small 3/8"/10mm socket wrench available (3/8" fits tighter). 3. Optionally, wear a headlamp so you can see clearly inside the unit 4. Optionally, put Teflon or silicone grease on the metal axle tube before putting the plastic tube over it - this will help the unit rotate easier 5. When starting to put on the 8 panels, have the 2 end octagons lined up with their 7-hole side straight up. This is absolutely critical. 6. Constantly verify that the center divider is positioned into the slots on all the assembled panels. You can easily knock it loose while installing the next panel 7. Double check that you tightened every screw and got the 2 tabs on each panel fully snapped into the square holes on the next panel. The panel join line should appear straight and flat, with no humps where the tabs are. 8. The sliding door panel is the last one to be installed and goes on the 7-hole side of the octagons mentioned above. Tucking its bottom edge under the first panel you installed and making sure all 4 tabs involved are snapped into the square holes requires special care. I removed two screws on the first panel I installed and then deformed that panel outward so I could tuck the last panel underneath it. This seemed to work well and all tabs and square holes were snapped together. 9. Optionally, run a 21.5 inch bead of black silicone sealer along the joints between the 8 panels. This may keep out rainwater, which helps keep the weight down and thus makes turning the unit easier. I also put silicone sealer inside every joint while I was assembling it - which makes a mess and is probably overkill. After assembly I put a sheet of thick plastic underneath the composter and added 8 gallons of compost material to each side and sprinkled on 2 gallons of water and tumbled it. I noticed that about half the water leaked out of the weep slots in the end octagons. So the concern above about rainwater entry may be overblown, since it would drain out anyway. I suppose it might wash away nutrients, though, so water intrusion is probably best controlled.
J**A
PIA, missing screw, but we got it done.
As everyone said the instructions provided are beyond terrible, which makes it difficult to put together. Add to it, it’s missing a screw. First of all, nuts and screws cost pennies so put an extra nut and screw inside so you aren’t wasting money shipping a damn screw. It’s common sense. Also, the composter did not come in its own box inside the amazon box. The amazon box had some damage and the plastic zipped bag the nuts and bolts came in was opened and pieces spread throughout the box. A damaged box and loose parts does not mix well. I will be contacting them for the missing screw. Next, at least at times, you may need two people to help put this together. Try to find someone who isn’t easily aggravated. I regretted asking my husband to help who wanted to take a hammer to this to separate the poles when they got stuck tight. I refused as I was afraid he would ruin the plastic. He admits he’s a bit of a Neanderthal. You will need a Phillips screw driver and a wrench. I had the bottom put together wrong so pay attention to the size of the pieces. It’s not supposed to be slanted. 🙄 Usually I’m better than that, but my dogs climbing in my lap while trying to put this together apparently distracted me. The middle separator is a pain, this is where two people help to keep lined up as you screw the pieces together. Don’t try to force it, just unscrew the outer pieces until you can readjust. Don’t tighten the screws all the way until you get finished so you don’t strip them trying to undo them. You may need to undo them until you figure this out. The nuts on the actual composter are self tightening so you can hand tighten a bit and you won’t need two hands to finish tightening them. It seems sturdy enough now it’s together, even with the one missing screw. I may spray the legs with Rustoleum to protect the metal, which I think may rust since it will be sitting on the ground year round. It definitely took awhile to put it together, but hopefully worth it. We shall see!
J**T
Good product for a novice composter with a small yard
Bought this a little over a year ago. Not sure what the fuss is about with the assembly, it was easy. Make sure to put something down if you're doing it inside, as it does have some oily residue that's a little messy. This was my first attempt at composting, and the first year was iffy. I definitely didn't have enough browns, it started smelling off. Got smarter this year and saved a couple of bags of leaves from fall cleanup. In March, after almost a year of cooking, it was finally looking close to something useful. I ended up putting on some garden gloves and crumbling it by hand, as I had a lot of matted balls rather than loose crumbles. It's a little challenging to get it all out when you're trying to empty it, but not a huge deal. Emptied one side first, then the other about a week later. Sifted it over some plastic fencing and dumped the big pieces back in to break down further. Also, meant to move it into the garage during winter but it was too heavy, so I left it out and it survived the Chicago winter just fine. Now onto my second batch, and already it's looking way better than my first attempt. Not sure if it's the higher ratio of leaves to scraps or a little bit of the first batch to jump start the process on the second batch, but it's already looking way better - looks like I could get a finished batch in the next couple of months. I was definitely losing faith and wondering how everyone else had such success when I didn't, but it's just a learning process. Anyway, it's a good product, easy to use, neat, and effective!
T**2
Glad to have this tumbler
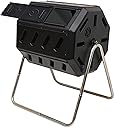
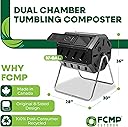
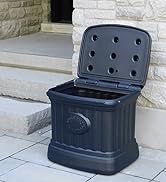
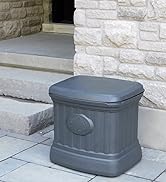
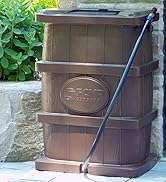
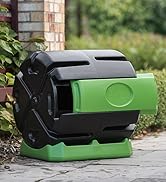
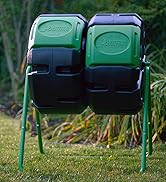
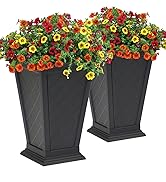
Needed to find a more accessible compost bin. Our large compost bin will still be used for yard waste, etc but it's too hard to turn the materials deep down. Have been interested in compost tumblers that meet these criteria: made in America or Canada, tough enough for northern winters, discourages wildlife access, large enough to heat up the materials to form compost, easy to fill and empty, not too heavy for a senior to move. This composter is Canadian which I trust much more than a Chinese built unit. Canadians know winter and this composter appears solid. First, ignore the reviews stating this compost tumbler is difficult to put together. 68+ lady here, and it's not hard at all. Just takes time. As others suggest, watch a few videos on the assembly and you are good to go. I used a Phillips screwdriver, pliers. The assembly took about an hour but I took my time. Hint: if you assemble this indoors as I did, use the box to cover your floor/carpet. The support stand width is about 28" across at the bottom, not 24". Be careful to assemble the stand pieces correctly. There are two longer bolts...set these aside as they are for securing the main bar to the stand, one on each end. The black plastic tube covering the main steel bar comes in one piece, not two as shown in some assembly videos. After placing the two end pieces with the separator in-between onto the bar (they flop all over and slide during this step), secure the bar onto the stand with the two longest bolts. Then you are ready to place and attach the panels, one at a time, securing each panel as you go. The company provided a few extra bolts and nuts which is appreciated. Be sure to watch a couple videos as you need to have the end panels with the vents exactly the same, ie be sure the vents are in line. If the vents are not lined up the same, panels assembly will not work. Each panel fits only one way and snaps into place, but you must bolt them into place securely. They snap into place as an assistance with assembly. Be careful to tighten the bolts snug but don't over tighten as you may crack the panel. Panels are secured with the included nuts and bolts. Fit the separation panel into the slots built into the panels as you go. This takes a little work but I did fine even with arthritic hands. One big plus is the large sliding cover. It slides either way and can easily be taken off for access to the interior. This is much better than two separate small covers. Plenty of room to dump a pail of vegetable waste without spillage. Seems like a well built composter. The plastic is heavy duty, thick. More manageable than the giant bin we've used for decades. We don't have bears in our area, just the regular curious wildlife. Likely, the critters won't be interested in the composter. Even if they are, it will take work to chew it or open it. We are looking forward to years of composting with this tumbler.
G**G
Good Enough
This is a product that’s actually worth spending the time to write a review. The FCMP IM4000 arrived yesterday in a relatively small box considering the final size of the composter. It was very well packed and all the components were there and in good shape. The plastic panels are not incredibly robust but are well designed and fit together easily. The metal stand appears to use tubing just a wee bit thicker than what was used with beach-chairs of old and may be the eventual weak point, but for the next few years it should be fine. I might put a base underneath to secure the bottom tubes and prevent their anticipated spread and therefore weakening of the structure. If FCMP offered a reasonably priced plastic base to both secure the base tubes and keep them off the dirt, I’d buy it. For a moderately capable DYI’er, assembly was easy and obvious. A 10mm box wrench, a small adjustable wrench, or even basic plyers and a flat screwdriver are all one needs; however, the screws also have a square (Robertson) recess and a SQ1 bit with a ¼” hex-driver makes assembly much easier. The serrated bases on the flanged nuts mean that, with finger tightening of the screw to the nut, there’s probably no need for a wrench or plyers when tightening those screws – the serrations bite into the plastic and the screws easily tighten with possibly just a little pressure applied with your fingers to the nut. The only exception is with the nuts and screws that attach the axel bar to the stand – for those you’ll want wrench or pliers. I did find the on-line instructions to be significantly better than those provided with the product. Just remember that the panel with the slide is the last one to be installed and it attaches to the end cap edges that have 7 vice 4 holes. Also, the chamber divider panel needs to fit within the side panels’ inner slot. The first few panels may be problematic in making sure that the center divider remains in the slots, but as more panels are added, everything lines up and assembly becomes easier. All of this will make much more sense as you look at the parts and start putting things together. Anticipating that grit will eventually make its way into the space between the axel bar and its outer plastic sleeve/tube, I applied a layer of silicone grease (that I happened to have on hand) along the entire length of the axel. I figured that, while the container was empty, this easy bit of pre-maintenance would likely save me some frustration in the future and allow the tumbler to spin much easier. I fumbled and bungled a bit, but it was all together in under an hour. In fact, writing this review is taking longer than putting together the tumbler. The final product could be higher off the ground, making it easier to empty the chambers. Putting a plastic sheet underneath and dumping the contents on that, which is what FCMP recommends, seems lame. I’d much rather put a small wheelbarrow or big bucket underneath. Those are something else that FCMP should market. I did consider the much better built Jora tumbler, but couldn’t justify the significant price difference. I also purchased a compost thermometer and some composter starter. Theoretically, in 2-8 weeks, I'll know if this works as hoped. If so, in the end, the FCMP IM4000 will be good enough.
J**I
Decent product but assembly is insane
Item is sturdy once you get it together. I haven't had time enough to produce compost for review, but this is a rather tried and true concept so I'm sure that will be fine. My main problem is with the assembly and instructions. As an engineering educator, this does not meet even the basic concepts of lean Jidoka, design for manufacture, or design for assembly. The stand can easily (because of very similar looking parts) be assembled in two different wrong ways. This would cause the customer to have to disassemble and start again. The screws are square/flat combo heads and a square drive bit or tool should at least be included, but is not, so the customer doesn't have to buy one as they are less common. Then the construction of the barrel is very difficult to do with one person because the panels are free rotating during assembly. the screw and nut threading presents arm reach challenges especially as you finish the barrel. I had to assemble with my partner's assistance. There are 56 screws in the assembly of the barrel which is extremely excessive and wasteful. Designing tabs or snap features into the plastic pieces could have eliminated at least half of them and made assembly far easier while also saving cost for the manufacturer. The separation bulkhead is hard to locate and is free to pop out and rotate until the last few panels are installed which again could be solved with tab features. If a student presented me with this assembly in a CAD class I would give them a D. If you buy this product have a partner to help you put it together and pay very close attention to the instructions and the orientation of the drawings. Once together it works well and is a sturdy product, but that was a lot of time and effort to shift off on to the customer while simultaneously making the product cost more due to an excessive hardware fetish.
K**N
Good value, easy to assemble
This package came quickly and was easy to put together once I figured out a way to stabilize the barrel while putting on the panels! I’m a little concerned about some of the vents in that they may allow compost to fall out onto the ground. Hopefully not since I got this elevated composter to avoid attracting pests in my city garden. All in all, a very nice product that I’m looking forward to using!
A**R
Home composter
Delivered much beyond the scheduled date that too after taking up the matter with the CC. Assembling the product is really tough. Look for the marking on the frame for correct allignment ( Could have been printed in the slip) and the holes &buttons on the panels for trouble free fixing. Looks sturdy .No comments for the performance of the product since its just two days.
A**Z
Buen compostero
Es bastante amplio, los materiales son de calidad. Tiene muchas piezas y lleva un tiempo armarlo, no viene con herramientas para ensamblar pero solo se necesita un destornillador y una llave. El ensamblado es bastante fácil.
D**N
Badly made
Several panels were cracked and damaged. Pieces did not fit together well. Overall a poorly constructed piece of garbage. Do not buy!
A**ー
Easy setup
Quick delivery and easy set up
D**G
I recommend!
Tidier than our old compost heap. Rodents cant get to it. Can easily move it. Assembly takes time.watch youtubes to do it without frustration. Very sturdy.
Trustpilot
3 weeks ago
3 weeks ago