We remain fully operational. Our teams are working around the clock to ensure your deliveries continue safely.

Descargar la aplicación


Servicios al cliente
Sobre nosotros
Copyright © 2025 Desertcart Holdings Limited
Descargar la aplicación


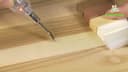


✨ Elevate Your Space with Effortless Repairs! ✨
The Picobello G61403 Premium Wood Repair Kit is your go-to solution for restoring the beauty of laminate, parquet, cork, and varnished surfaces. With 15 hard wax sticks and a melting device, this kit is designed for easy application and professional results, making it a must-have for any home improvement enthusiast.
| ASIN | B00KYTAPGQ |
| Brand Name | picobello |
| Contains Liquid Contents? | Yes |
| Customer Reviews | 4.3 4.3 out of 5 stars (572) |
| Item Weight | 499 g |
| Manufacturer | Picobello |
| Surface Recommendation | Wood |
| Unit Count | 1.0 count |
S**9
Pretty cool and did the job....cheap compared to other repair methods.
Ok...so its still early days regarding the repair (1 week) but wow what a difference. I used it on my hand scraped oak floor which had some light...ish scratches. Step 1 was to throw away the instructions which are in german anyway. Step 2 was to work out which way to put in the batteries (wish I had kept those instructions!). I watched a utube repair video but decided that was too much work. Step 3 I started by putting some grain highlights in first...then filling in the rest of the colour. Step 4...I used the plastic scraper to get it flat. Step 5....slapped on some sealer (supplied) and after a cuppa I buffed it with the abrasive cloth hidden in the handle of the scraper! That was pretty much it...if you have large damage then maybe follow the instructions to the letter but on a hand scraped floor it's kind of a little rustic anyway so no big deal. The colours didn't look like a great match in the box but once on they were OK actually...if you are smart I reckon you could add another colour to change the base wax slightly. The red, yellow and green didn't make much sense until I read that you can also also repair ceramic tiles :-) Update...still very happy....still repairing scratches with ease and they seem so far to stay repaired too which is always a worry with these kinds of kits
L**E
Takes a fair amount of practice to match colours - ...
Takes a fair amount of practice to match colours - but with patience this can give you a near invisible result
G**E
Good bit of kit.. get your batteries ready!
Having actually used this now I can confirm that this is brilliant! I had to fix some terrible marks and its done a great job. Needs a steady hand and a keen eye though, don't expect to slap this down in 5 mins. The pen knife heats on a battery and the material slides off and onto the knife easily, way easier than I was expecting - no mess. My only gripe really is that the batteries don't last long enough and rather than running out just fail to heat the knife as much as they did at the start. Wish they could have created a simple charging mechanism.. even just a standard phone cable charger so i didnt have to keep using up batteries!! on a big job it can be a pain. However, regardless, this kit is excellent and if you search for their company name in youtube there are some great tutorials because the documentation wasny in English... (videos are way better anyway)
M**H
happy enough
After dropping a plate onto a laminate floor and witnessing the damage done (two nice chunks out - about 3mm wide by 40mm long nicely matching the edge of the plate as it shattered :-() I decided to give this a try as i could not make it any worse. Long story short i am very happy with the results. From my experience (oak laminate) do practice with it (there is plenty of wax filler), i found it best to fill the hole with the lightest colour and then introduce small drops of the darker ones, but each time making sure you melt all of the wax. i finished of by putting a few very faint dots in with a black biro to match the grain on the laminate. Is it 100% perfect, no, but unless you know where to look and catch it in the right light you cannot see it.
N**5
Good kit
I found it quite fiddly to do, i think the blade on it is left handed. That said i fixed the huge dent i made in the floor with good results.
K**G
Four Stars
It is easy to use with some practice
M**L
Mike
If you have basic DIY skill you can handle German - but still you have picture step by step - great staff can match all color, free battery, all working really well!!
M**.
thank you.
thank you.
M**L
Ausbesserungsarbeiten mit Hartwachs habe ich vor einigen Jahren mal im Boden der alten Wohnung meines Cousins gesehen, und war damals vom Ergebnis begeistert. So nun hatte ich dieses Jahr einen Umzug und wie es so oft passiert eckt man hier und dort mal in der Hektik wo an. Zu Meinem Pech dann auch einem Weißen Türstock. Prompt war auch noch eine Ganze ecke (gute 12mm) herausgebrochen :-O So nun hatte ich laut Absprache mit dem Eigentümer mehrere Möglichkeiten entweder auf einen Teil der Kaution zu verzichten, einen Handwerker zu Engagieren oder den Mängel wenn Handwerklich begabt selbst zu beseitigen. Ich entschied mich für letzteres und erinnerte mich an die Hartwachsreparatur schliesslich suchte ich nach dem geeigneten Werkzeug und stiess letzt endlich auf dieses Set. (Vor dem kauf habe ich mir auch noch einige Videos auf einer großen Videoplattform zu Reparatur mit einem solchen Hartwachsset angesehen, und war erstaunt wie groß und vielseitig das Einsatzgebiet ist.) Den Artikel ausgepackt und in Betrieb genommen. Und sofort mit der Vorverhandlung der Schadstelle begonnen (Lose stücke entfernt) Dann denn passenden Farbton aus der großen Anzahl der Hartwachsblöcke gewählt (Man kann auch mehrere Farben Vermischen um den Gewünschten Farbton zu erhalten), dieses mit dem inbegriffenen Werkzeug aufgeschmolzen und Stück für Stück die Schadstelle mit dem Hartwachs aufgefüllt (bis es gut Übersteht) Das Wachs kurz abkühlen lassen und dann in richtung der Maserung mit dem Rillen Spachtel abhobeln. Auch Runde Kanten lassen sich dadurch Kinderleicht nach Modellieren. Nach dem die Schadstelle korrigiert ist diese mit dem beiliegenden Schutzlack versiegeln und nachdem dieser getrocknet ist, kann der Glanz des Schutzlack mit dem beiliegendem Poliertuch angepasst werden entweder Glänzend oder Matt. Ich habe mittlerweile schon viele Ausbesserungsarbeiten im Familien & Freundeskreis mit diesem Set durchgeführt, Alle samt waren mehr als begeistert von den Ergebnissen. Fazit: Wer einigermaßen Geduld hat kann mit diesem Set viel Geldsparen wenn es um Ausbesserungsarbeiten geht. Klein und Handlich und schnell einsatzbereit.', Kinderleichte Handhabung. Des Weiteren findet man viele Videos für viele Anwendungsfälle auf den großen Videoplattformen ;-) P.s. wie sagt man so schön ein Bild sagt mehr als Tausendworte. Anbei zwei Bilder nach der Reparatur.
A**R
Great addition to the kit. Worked well on tiles. Takes practice.
F**.
Buongiorno a tutti, ho acquistato il kit di riparazione per poter rimediare ad alcuni danni accidentalmente arrecati alle piastrelle di casa senza sostituire le piastrelle. Devo dire che inizialmente ero scettica, ma ho deciso di provare comunque. Che dire, sono rimasta soddisfattissima. Il pacco è arrivato con un giorno di anticipo ed al suo interno il kit era perfettamente imballato. Dentro la confezione si trovano un piccolo apparecchio per riscaldare la sostanza (che penso sia cera ma non ne sono certa) i panetti di diversi colori, dei piccoli panni da utilizzare per levigare e rendere uniforme il materiale durante il procedimento. Anche se il procedimento può inizialmente apparire ostico in realtà, seguendo il video illustrativo messo a disposizione dal produttore nel sito, tutto si è dimostrato abbastanza facile e onestamente pure divertente. Per ciò che attiene i risultati, personalmente mi ritengo abbastanza soddisfatta. Se il buco nella piastrella è di piccole dimensioni, la riparazione eseguita con il giusto mix tra colorazioni, non si nota nemmeno. Diverso il discorso per buchi particolarmente grandi, lì un pò si nota perche comunque pur ripetendo il procedimento un paio di volte il dislivello si nota. Con buchi particolarmente grandi intendo diametro 5 mm e profondo circa un paio di millimetri. Per ciò che attiene le piccole scheggiature invece non si nota nulla e risulta certamente più economico che procedere con la sostituzione della piastrella. Concludendo dunque mi sento vivamente di consigliarlo e aggiungo inoltre di non demoralizzarvi se inizialmente non riuscite a trovare il giusto mix di colori! è solo questione di tentativi! Allego una foto dimostrativa. La scalfitura era di dimensioni medio grandi e di colore nero. Dopo l'applicazione del prodotto la scalfitura si nota solo a distanza ravvicinata mentre ad altezza uomo non è assolutamente percepibile.
H**N
Works perfect. But be aware when the wax melts, a bit of learning curve here. But fun to play with and the final result is only up to You.
I**E
Utilisé pour rattraper une zone abîmée de notre parquet stratifiée. Le résultat est très correct puisque nous ne voyons "quasiment" plus le défaut (dont une personne n'en connaissant pas l'existence passera à côté).
Trustpilot
Hace 2 semanas
Hace 1 mes