We remain fully operational. Our teams are working around the clock to ensure your deliveries continue safely.

Descargar la aplicación


Servicios al cliente
Sobre nosotros
Copyright © 2025 Desertcart Holdings Limited
Descargar la aplicación


✨ Light up your space, power your life, and own the vibe! ⚡
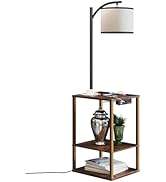
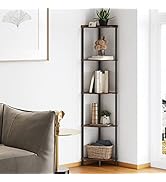
The SUNMORY Floor Lamp with Table is a multifunctional, modern accent piece featuring a 9W 800-lumen LED bulb with 3 color temperatures, integrated USB and AC charging ports, and a sturdy wood frame with three-tier shelves supporting up to 50 lbs. Designed for easy assembly and versatile use, it combines ambient lighting, device charging, and stylish storage in one compact unit perfect for living rooms, bedrooms, and offices.


| ASIN | B09W9HY1Q6 |
| Assembly Instructions Description | The product requires assembly. |
| Average Life | 30000 Hours |
| Base Color | Brown |
| Base Material | Metal |
| Base Type | E26 |
| Batteries Included? | No |
| Batteries Required? | No |
| Best Sellers Rank | #13,470 in Tools & Home Improvement ( See Top 100 in Tools & Home Improvement ) #114 in Floor Lamps |
| Brand | SUNMORY |
| Color | Rustic Brown |
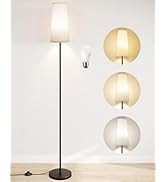
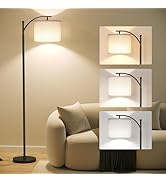
| Color Temperature | 5000 Kelvin |
| Customer Reviews | 4.6 4.6 out of 5 stars (2,716) |
| Date First Available | October 15, 2021 |
| EU Energy Efficiency Label | Highly Efficient |
| Finish Type | Coated |
| Finish types | Coated |
| Furniture Finish | Brown Coated |
| Handle Finish Type | Coated |
| Included Components | √3 color temperature LED bulb √Linen lampshade √Charging station |
| Includes All Assembly Tools | Yes |
| Indoor/Outdoor Usage | Indoor |
| Is Customizable | No |
| Is Foldable | No |
| Is Stain Resistant | No |
| Item Weight | 3.53 ounces |
| Item Width | 11.8 Inches |
| Item model number | Toy Gift Activity Play Mat |
| Leg Style | Straight Leg |
| Light Direction | Downlight |
| Luminous Flux | 800 Lumen |
| Manufacturer | SUNMORY |
| Material | Linen Fabric Shade, Solid Metal, Wood Laminate |
| Maximum Compatible Wattage | 60 Watts |
| Maximum Weight Recommendation | 6.5 Kilograms |
| Number of Height Positions | 1 |
| Number of Items | 1 |
| Number of Lights | 1 |
| Part Number | PFL-012A |
| Power Source | Corded Electric |
| Product Care Instructions | Wipe with Dry Cloth |
| Product Dimensions | 16"D x 13"W x 62.2"H |
| Recommended Number of People for Assembly | 1 |
| Recommended Uses For Product | Corner, Reading |
| Room Type | apartment, craft room, living room, bedroom, study room, office, reading room, corner, office, playroom |
| Shade Color | White linen |
| Shade Material | Linen |
| Size | 62.2 inches |
| Special Feature | Corded, Storage, ✿3 Color Temperature LED Bulb ✿2 USB Ports✿1 Power Outlet✿E26 Bulb Base ✿Adjustable lamp holder✿Linen Lampshade✿3-Year Warranty |
| Special Features | Corded, Storage, ✿3 Color Temperature LED Bulb ✿2 USB Ports✿1 Power Outlet✿E26 Bulb Base ✿Adjustable lamp holder✿Linen Lampshade✿3-Year Warranty |
| Specific Uses For Product | floor lamp for living room bedroom, floor lamp with table, floor lamp with shelves, coffee table, side table, couch side table, storage table, bedroom nightstand, storage end table, corner lamp, standing lamp, table lamp, table lamps for living room, lamp with shelves, side table lamp, side table with lamp, end table with lamp |
| Style | Country Rustic |
| Switch Installation Type | Floor Mount |
| Switch Style | Rocker |
| Table design | End Table |
| Tabletop Thickness | 0.4 Inches |
| Theme | Rustic |
| Tilting | No |
| Tools Recommended For Assembly | Screw Driver |
| Top Color | Rustic Brown |
| Type of Bulb | LED |
| Voltage | 120 Volts |
| Warranty Type | Limited |
| Wattage | 9 watts |
K**.
VERY STURDY, extremely easy to assemble, and looks good
I was slightly skeptical about the reviews of this piece because after all, cheap furniture is cheap furniture. You'll always be hard pressed to find something decent. Well, this is it. This is a very solid and sturdy piece of furniture, no shakes or wobbles, no worry about putting weight on it, no concerns about USING it. The legs are very sturdy and solid, and surprisingly, so is the lamp rod. I wasn't expecting the lamp rod to be anything more than what you usually get from a cheap floor lamp, and it's remarkably solid and screws together firmly. It really doesn't look bad, certainly nothing worse than any other piece of flatpack furniture, but I do like the lamp rod and overall looks, especially for the price. This is one of the best pieces of DIY furniture I've yet purchased. I built it in well under an hour and without even referring to the instructions - it was just that easy. I looked and didn't see the instructions right away so I just assumed it wasn't even required, and really, it wasn't ultimately. I'm pleased with that. I don't really intend to use the other functions very often, but I like that it has built-in USB and power plugs. The power jack seems solid when I connected a phone charge to it, and standard USB power is pretty straightforward. Testing with a USB rechargeable flashlight, the charging works as you'd expect. My one and only small gripe is that I think it should've had black legs. The lamp rod is black, and I think that would look better as most other flatpack furniture usually has black legs. That's a minor gripe though, and just a matter of preference.
R**O
A nice small lamp/table
This is a really nice table/lamp. It is well designed and easy to assemble. For the price I think it is worth it. There was a tiny chip on the corner of one of the shelves, but it is not very noticeable, so I am ignoring it. All in all, I am satisfied with the purchase.
A**L
The House-Mouse’s Handyman Guide
The box comes very organized. (Reminds me of working in my grandpas shop). Unwrap all the boxes inside, stacking boxes, organizing bags/panels, and having a trash pile as you go to keep it in organized fashion/squared away. Look to the list on your instruction pamphlet. Is it all there? Go through each piece/bag on the list: 3 panels, a lightbulb, lampshade, etc. I usually put these in places in front of or surrounding me similar or in the order of the list. (there are extra screws, don’t worry/overthink it, and put them aside out of your circle ⭕️ of useful things as you go) Put the panel (board, like a square cutting board) off to the “working area,” like the counter space you’d use to begin preparing the final spot of your dish, or to put the final stack of folded laundry. As you build, keep in mind you will be flipping this over. You’re building from top to bottom *from the floor* and will turn it over at the end. This means the side of the middle panel that can go either way? Face *up* the side you want facing the ground and out of sight later. It’s a mind warp, I know, but stay with me. Okay, the panel that has four normal holes in the corners and a big hole in a center of one side, two center holes opposite, (if you’ve pieced together any kid toys/furnitures/stools at all, you’ll probably do well even without my description, go on, brave soul) that’s the bottom (for now, ultimately the top later) that we are starting with. Find your power box where you placed it when organizing your pieces, possibly in the order of the list. You also find the littler big head screws. Use two of them, the extra can be put aside out of your workspace, you don’t need it anymore. You can screw these in with your fingers first and tighten with the L bar hex screw after. “Righty tighty-lefty loosey” is the general rule of thumb if you haven’t heard it before. It’s just a saying that helps you keep things in your memory, called a mnemonic. You most likely heard these kinds of things as a kid all the time. Anyhoot, first step done, power box is on. There’s only one way it will fit in terms of right side up, just make sure the wires are toward the inside and the plugs on the outside. Next, find the small dough roller/tootsie roll looking screws. Again, there will be one extra, put aside and don’t worry about it. You screw those into the four corners. Then you find the four long poles (doesn’t matter which end) and turn them (as in the whole pole) righty-tighty until they’re tight (I doubt you’ll break the panel, but generally *snug* not too much more than a swaddle kinda tight you put your kid in, there’s no need to suffocate these poles either). Make sure to line the pole edges up right, you do this all the time when hanging pictures parallel to the ground, this is arguably easier, I believe in your lineup skills. Easy peasy. Unless of course you aim for edgy and off center (like a diamond) which I guess is an option if you’re into that. The bigger tootsie/dough rollers going into the ends of those poles that obviously arent the snug side. Righty tighty. This panel going on is the middle one, the one we talked about earlier. The side you don’t want to see in the end result you’re gonna need to face *up* and look at *now* okay? Okay. It’s easier than the eye of a needle but be gentle if you don’t want scratches. Place on top, gently move a pole towards the hole if it didn’t go in right away. Guidance is sometimes necessary, it happens, it’s nothing to be ashamed about. Let’s keep moving. Like the long poles, the short poles get spun on now, then the last panel gets its place like the middle, easy peasy. The last panel has a sticker on one side, the sticker generally faces up so it’s ultimately on the bottom. It marks the side that has the bigger circle over the normal hole. This is so the heads (top part of the screw) can rest there comfortably without bulging out for no reason. It makes it more flat and uniform. And stable. We all like stable. Place the foam squares (EVA cushions are the real name, noted on the directions) on those corners so that if you have hardwood floors you won’t scuff or scratch them. Also to prevent the screws from rusting if it gets moisture on them. Yay, we have our stand! Flip that thing over and admire how far you’ve gotten. If you have bad shoulders back or no strength in your hand, don’t be shy in asking for an assistants hand in flipping it. (Alternatively, use pillows or blankets to drop it as soft as you can to the floor, then slowly use leverage to lift). You’re doing well. Let’s keep it up and goggle at the intimidating looking lamp post sections with the wire running through it like a hoody or shorts string that could disappear forever. The trauma is real. Breathe past that. We’re gonna do this and it’s gonna be great. Mistakes are interesting and educational but we’re aiming for first and only try here so we can get onto important things, like relaxing and rest. (Rest is good because it makes work more productive. Go easy on yourself when you need to rest okay? In fact, go get some water and hydrate now. Bask in your competency of starting a project and staying with it). Ahem, next, the instructions have several steps together. Let’s tackle them in order. We lengthen out the pole, careful not to pinch the wire (we take care of our things and also don’t want to cause a fire hazard) and push the poles together, spinning them snugly. (Again, not tight enough to crack anything, because some of us don’t know our own strength. Time to learn the snug way). As for the bag on this, you can slide it off or just cut it free, either works and no way is better than the other. It happens more than people want to admit, this isn’t a reasonable hill to die on. So take the washer and “hexagon nut” (the circles at the bottom of the pole, one is like an inside-out screw) off. Lefty-loosey. Then we can get the wire through the top panel, and replace the washer and nut 🔩, which will fit snug and make it not-wobbly. Again, everything you took off goes back on. Fix the top of where the light bulb will be *above the center,* that is, not outside the panel area. You can always check by looking down or up by the panel to see if it’s in there. If you have the mind for it, imagine it as a 3D chessboard, the entire area is a rectangle full of squares. Nothing strays outside of this rectangle. Hold the pole as you tighten it with the toddler sized wrench 🔧 or it will move. Righty tighty. When using a wrench instead of your fingers you place it on the nut and turn, then take it off, reset closer to the open space, and repeat until snug. The point being that unlike the hex wrench you sometimes don’t have the space to keep turning it in circles indefinitely, sometimes it takes a few turns since the poles (or a wall, in some cases) are in the way of your spinning. Yay the pole is attached! Next step in the multi step that is (5) is the lamp. There are two round wiry pieces, the lamp shade, and the plastic washer/nut that’s already attached to the lamp pole we just raised. The wire circle with the bowl shape is on top. We know the bowl shape is right side up when the center touches the table, not the rim. This piece is not a hat, but a bowl. The rim is the top. The instructions say concave, which describes the same thing, but chances are, most people reading this have not taken a math class with that word in a long time. It’s been over a decade for me too. Here’s to dragging up old knowledge! Concave. What a nice word. The lampshade is like a scroll. We unroll the scroll (ha) and attach the bowl rim which the bottom of the bowl being inside the shade, on top, and the boring (less interesting/simple) wire rim circle is on the bottom. Any side of the scroll is top or bottom, it’s the same design, unless you paint it yourself as if it’s canvas. I recommend snapping the first mouth claw looking thing on the shade and unraveling the scroll as you snap it on the rim. Keeping the scroll all the way open seems more trouble than it’s worth. But if you want to try, instead of taking normal advice, there’s no one stopping you, go ahead and try. The bottom rim is on the bottom, snap and put the Velcro to hold the opening together to close. Rejoice at your lampshade. Lefty loosey that nut on the top of your pole light, place the shade by putting the bottom of the bowl/small inside hole with the screw looking ridges through it, then righty tighty that nut back on. Screw the bulb on firmly, careful not to crack it or leave it wobbly as a hazard. Use your best judgement, make good choices. Last “step” is two steps. Link together the wire from the lamp pole to the small wire on the back of the power box (the very first thing we put on, now just under the top panel). You do this by lining up the two metal prongs with the two prong holes inside those links. Be aware there’s a thirds hole at the edge that needs to also line up. Using one hand holding it like a pencil, and the other holding it like sidewalk chalk, you hold them together and use a small attached nut (yep, there’s another one, and it blends in) to screw it together and hold it in place. Then, seeing the chow the connected wire hangs, you may use the wire holder pieces (two came with mine) to manage the wire closer to the panel, making it look nice and not messy. The wire *clamps* on your list are for the wall plug wire, to manage it down one of the four corner legs all the way to the wall. To make it look nicer and not messy or a hazard. Thanks for going on this journey with me. I hope any of my confusions are cleared up by the actual instructions, and any confusion the actual instructions give are cleared up by my own chaotic review. Good luck! It works for me, so I give 5stars.
A**R
Good Buy!
It is pretty easy to put together. It would have been nice if the parts were marked with a sticker, that say’s A,B,C, etc. it’s a common sense test. I am a 71 year old Woman and put it together in about 30 minutes. Would have been faster with better markings and Directions! Other than this I would have given it a 5 Stars. Looks real nice.
L**D
Great floor lamp/table as well as the company's customer service!
I received the floor lamp/table and set it up -worked great the first night but after it would not go on- think it was something with the rocker switch. You can not fix it as it is in a box component. I wrote the company and within a few hours Grace contacted me asking for a few details. I checked out the various things she asked about and wrote back. She again came back to me within a few hours saying that some new pieces would be sent out to me and I should get them in a few days. I did not need to send them anything back. To my surprise a whole new floor lamp/table was delivered to me within 2 days! Set it up and viola- perfect! It has been working great since then. This item is well made- sturdy on my rug, the white goes well in my bedroom, the lamp is wonderfully bright! It is just what I have been looking for and the bonus is the shelves which are handy for my night time reading book, bottle of water etc... Grace contacted me twice since I got the new one to make sure all was well with it. Outstanding customer service! And the floor lamp/table is pretty nice too!
J**E
Highly recommend for price, quality, exactly
Very easy to assemble, good quality. Was exactly as described. Perfect size for us using between our 2 rocking chairs. Light is bright and perfect for while reading or working on craft projects. Great price, too.
A**R
Simple. Sleek. Nice.
The table is sturdy, looks great, and was easy to put together. Only complaints are that the instructions label the pieces but nothing is actually labeled. Thankfully the photos are easy to follow, also the velcro pieces to hold the cord to the legs are a tan color rather than black which would hide them better. Easy, light weight, and the perfect size.
A**Y
Arrived early, well packaged. All parts were there. Easy to assemble. Not really heavy. Bought for grandparents apartment as they have no ceiling lights. The tables look great no cracks or deformities in wood. Measurements were accurate and fit nicely in the area were they needed to go. Good height. Love the outlets on the table as it make it easier to access then bending over to the outlets on the wall.
R**D
We needed a small end table, finding an end table with a tall light was perfect. It add height to the corner, without sacrificing table space. The lampshade comes flat, and you assemble on the rings provided- the creases release over time.
M**Y
Pretty sturdy. I thought it would be a tad bigger. But that’s on Me for not paying attention to the measurements. Easy to put together. And perfect for the application of what we wanted it for
A**E
This table was a piece of cake to assemble. One of the usb parts was not working . We contacted the company and they are sending a new part. Customer service is very good. We love the table and it works for the space we needed it for. My only issue is the lampshade. It shows dimples and bends. I thought they would settle after a few days but no such luck. Still worth buying though. I might buy another shade. Just an update. My lamp has stopped working and the usb port does not work at all . Tjis lamp was purchased less than a year ago.
A**H
Good sturdy product. Quite expensive....but again came with the bulb so 5 stars.
Trustpilot
Hace 4 días
Hace 1 mes