We remain fully operational. Our teams are working around the clock to ensure your deliveries continue safely.

Descargar la aplicación


Servicios al cliente
Sobre nosotros
Copyright © 2025 Desertcart Holdings Limited
Descargar la aplicación


Buy anything from 5,000+ international stores. One checkout price. No surprise fees. Join 2M+ shoppers on Desertcart.
Desertcart purchases this item on your behalf and handles shipping, customs, and support to Colombia.
🛠️ Upgrade your garage game—press bushings like a pro, every time!
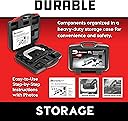
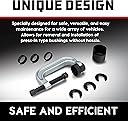
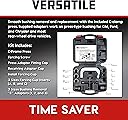
The Powerbuilt Upper Control Arm Bushing Service Tool Set (648604) is a durable, vehicle-specific kit designed for Ford, GM, and Chrysler models. Featuring a high-strength C-frame press and multiple adapters, it enables quick, precise removal and installation of press-fit upper control arm bushings without removing the control arm. This all-in-one set comes with a sturdy storage case and is built to save time and effort for both professional mechanics and DIY enthusiasts, backed by a lifetime warranty.


| ASIN | B0028QGT90 |
| Auto Part Orientation | Drivers Side |
| Auto Part Position | Upper |
| Best Sellers Rank | #46,335 in Automotive ( See Top 100 in Automotive ) #45 in Automotive Replacement Control Arm Bushing Kits |
| Brand | Powerbuilt |
| Brand Name | Powerbuilt |
| Color | Silver |
| Customer Reviews | 4.5 out of 5 stars 258 Reviews |
| Fit Type | Vehicle Specific Fit |
| Global Trade Identification Number | 00028907103723 |
| Included Components | Upper Control Arm Bushing Service Set |
| Item Weight | 9.2 Pounds |
| Manufacturer | Alltrade Tools |
| Manufacturer Part Number | 648604 |
| Manufacturer Warranty Description | Lifetime Warranty |
| Orientation | Drivers Side |
| UPC | 028907103723 |
| Unit Count | 1.0 Count |
T**Y
Right Tool for the Job
I used this tool successfully to change the 22-year old upper (and lower) control arm bushings on my 1998 Toyota Tacoma 2wd 5-lug. The tool is designed for older American cars with the "A-arm" style upper control arm with a shaft through the bushings. I took a chance and got lucky one size of the included adaptors fit perfectly for my truck. The quality of the tool is good, better than expected. I torqued on the C-frame pretty hard (with hand tools, no impact) to remove the old factory bushings and it never flexed or deformed. I considered a few cheaper no-name versions but am glad I spent the extra $20 for the Powerbuilt. The C-shaped adaptor that goes around the shaft to push out the bushing was too short to fully remove the Toyota bushing so I cut a section out of an old bushing to stack inside and extend the reach. (See photos.) Note the Toyota design requires removal of the the outside end of the bushing to allow this or any removal tool to fit against the end of the control-arm tube. The factory service manual just says cut. I used an air hammer and chisel to bend up the lip for clearance then cut with a reciprocating saw. That was the most difficult part of the job. Installation was easy. Used the same c-adaptor with the push cup to get the new bushing started. Replaced it with a flat bar to seat the last few millimeters. Bonus - I did not get pictures but I was able to use the adaptors in various combinations to remove and install the lower control arm and strut bar bushings as well, no burning or drilling the bushings. The C-frame was not helpful for the lowers so I used some all-thread and grade-8 hardware to press the bushings out and in, but the included cups and adaptors made this easy with a little head scratching and a couple sockets to get the setups just right. If I had had access to a standard Ball Joint removal kit with a larger collection of adaptors and cups it would have been faster to set up but I was able to make it go right with the included parts. I removed one bushing from the UCA via the caveman method (drilling the rubber, heating with a torch, hammer and punches, lots of swearing) before I found this tool. A couple of hours caveman versus under 10 minutes and no swearing using the tool... I am happy with this purchase even if I don't use it again for years.
T**R
Works great w/ some minor quibbles
Ok I used it toady. You do disturb alignment. You have to take 22mm nuts off bolts holding upper control arm on and swing arm out to remove 24mm nuts/washers/press bushings out. You can mark frame and try to mount control back on frame close to original location. Bushings press out from inside out arm. A receiving adapter goes on outside of control arm. It's supposed to sit over/around bushing on control arm(not bushing-it straddles bushing) but bushing was a little bit too big in diameter so it sat a little off center. A adapter goes on the inside to push bushing out. A c clamp w/ a treaded rod pulls the receiver and adaper together via a threaded rod tightened by a 22mm socket. I had to use a 17 inch long gearwrench flex head 1/2 inch ratchet to get enough torque to pop bushings. To press in new bushing,it is the opposite. The bushing is pressed in from the outside using a insert that matches bushing diameter. The other end of c clamp goes inside of arm w/o any attachements.Plenty of krano kroil was used to press out and press in bushings. I discovered that you really have to line insert up w/ bushing during press in and pay attention that it stays centered and doesn't slip to outside. This happened on first bushing and it slipped off bushing bent the metal lip of bushing and put a dent in outside corner of rubber. This was minor and since bushing was half pressed in I recentered insert and pushed it in the rest of the way. It looks ok in. Just a slightly bent lip on one side. The bushing on other side pressed in fine. Removal ,however ,involved the bushing being pressed out of arm but it remained seized on shaft. I removed shaft and put it in a vise. I removed w/ knipex pliers. Tommorow or wednesday i'll do the passenger side of my '99 dakota club cab R/T. Please note that this truck was garage kept w/ 50,000 orignal miles. Tool works well but I wish it would straddle outside of bushing better. I don't like pressing bushing out at a slight angle. I'm having trouble getting the upper control arm remounted. I think I will have to loosen bottom shock mounts so upper arm can be pulled back over the bolts on frame. I got arm back on frame. Brake line wouldn't mount. It was off by a 1/2 inch from the holes in arm.I inadvertently bent brake line swing arm back into position to remount on frame. Brake line got caught. After carefully rebending brake line,it went into place.
B**Y
Great tool
I tried to rent this tool from a local auto parts store but the only one I found was damaged beyond use and was also missing the receiving cup. This is the exact tool the auto parts store offers for rent (same brand). There are cheaper versions of this tool on Amazon but I ended up ordering this tool and it was definitely worth it. The tool is well constructed and comes with a nice case. I used this to remove and install the upper control arm bushings on a 1999 GMC sonoma and it worked better than I expected. It probably took 5 minutes to remove the bushings from each control arm and another 5 minutes to install the new bushings. It got rid of that annoying squeaking noise and the truck drives much better now!
R**N
Good tool
Works like a champ at installing ATV ball joints but the adapters only fit very small cars control arm bushings
N**D
Great tool!
Works like a charm! Well designed tool. Easy to use. I purchased for control arm bushing installation on a 77 Vette. Wish I had purchased the tool sooner because I would love to have used it for the bushing removal.
R**E
Great tool
Made the job very easy .
F**S
The kit works, but other parts may be needed, and customer service is unreachable.
This kit was intended to remove and replace two bushings on the front axle of a 2002 Grand Cherokee. The receiver cup was too small for the upper control arm bushings on the front axle. The 2-1/4" ID receiver tube that is part of OTC 7249 Ball Joint Kit is perfectly sized for these bushings. I also needed the removing/installing adapters from the OTC kit to remove and replace both bushings. I lost one part of the Powerbuilt kit - I've tried to reach Powerbuilt via their contact options, several times each, and have spoken to only one person who referred me to someone that did not answer. In a week, I've been unable to reach them again by phone, email, or their online request form.
K**.
A lot of good functionality
This works really good. I used it on a c10 front end. The upper control arm bushings were easily removed with this tool and installed. It helped a lot on the lower control arm bushings. I wish they would add more pieces for lower control arm bushings. Highly recommend
Trustpilot
Hace 3 días
Hace 1 mes